Showing posts with label Gingersnap Creations. Show all posts

Saturday 18 June 2011

Gingersnap Creations Random Redhead Challenge - Bags and Tags

Hi guys have you seen the challenge over at Gingersnap Creations that started on Wednesday 15th June - Bags and Tags.

Here is my June Muse make for the challenge and I've used string, packaging paper and my favourite thing of the moment vellum!


I've coloured the papers with distress inks and ZIG Art and Graphic Pens. The screw brad is from Kuretake and the safety pin charm was from Calico Craft, the chain was from my stash.

Have fun with the challenge, you have until the 17th July so loads of time to get something done!

Kim

Friday 17 June 2011

Gingersnap Creations Tutorial - Colouring Vellum

You guys all know that I'm a bit of a 'fingers in different styles pie' sort of person and like everything from fluffy and cute to industrial grunge and this week the makes have been more on the cute card side. So to shake it up a bit I've got my second tutorial for Gingersnap Creations today. Those of you who follow the Gingersnap Creations blog will have seen this on Sunday 12th June

Ok so you know that this month on Gingersnap Creations is all about using packaging in your art right? Well I've kinda cheated a bit for this tutorial. This one is making packaging rather than made from packaging!


What You Will Need: 
Stamps - Paperartsy Hot Picks 01; Paperartsy Clock Plate 5; Creative expressions Vintage Flight
Colouring - Alcohol inks (Terracota; Butterscotch)
Inks - Archival Coffee; Archival Jet Black
Papers - Vellum (or tracing paper)
Tools - Blending tool; felt for blending; Envelope template; Ruler; Craft knife; Heat tool; Scoring tools
Other - Vellum glue tape; Alcohol Inks Blending Solution


Make An Envelope Template
My envelope is a very simple design and I made the template from an A4 piece of paper to make an 18 cm by 13.2 cm (7 1/8 inch by 5 3/16 inch) envelope when folded. 


Make the Vellum Envelope
I used my scoring tool and craft knife to make the envelope from the vellum and stuck the side flaps down with the vellum glue tape.


Colour Vellum
To change the colour of the vellum I used the blending tool and alcohol inks.

For this techniques I added two or three drops of the alcohol ink to the felt on the blending tool then added one drop of the blending solution and then using circular motions worked from the outside inwards.

I started with the lightest colour, the Butterscotch, to colour the whole envelope then added a bit of the darker Terracota colour to the edges and corners.

Then when you have the colour the way you want it try adding a bit of texture by adding drops of the blending solution to the blending tool, without colour, and 'stipple' the blending tool onto the envelope, i.e. dab it onto the envelope and lift directly up without moving it sideways. You can see the effect in the close-up photograph at the bottom of this post.


Get Stamping
I used the Coffee Archival ink with the PaperArtsy C5 and HPXT01 stamps as my background stamping then stamped the sentiment and airplane from the Creative Expressions Vintage Aviation kit with Jet Black Archival ink.

To stamp on vellum  just remember to try not to wobble or slide the stamp when it is on the vellum and I also use a bit of careful heat from the heat tool to help dry off the ink after each stamping.


I just love the effect of the alcohol inks on the vellum almost like the glassine papers that are very popular at the moment don't you think? 

Have fun with this one and as always I would love to see what you do with it so drop by and give me a shout if you use it.

Kimx

Pin It

Wednesday 8 June 2011

Gingersnap Creations Tutorial - What To Do With Those Sweetie Wrappers

As the June Monthly Muse for the Gingersnap Creations blog I've been asked to do a couple of tutorials and as you know I love sharing how I make things with you guys. So here is my first Gingersnap Creations tutorial for you and you might need to get yourself comfy as it is a long one! Those of you that visit the Gingersnap Creations blog regularly will have seen
this on Monday.

I just can't throw anything away, nope not a thing - bet you are like that too? I keep things for that 'just in case' moment and I had one of those 'just in case' moments recently that ended up
like this:


Would you believe that this is all made from sweetie wrappers? Would you like to make one too? I know you have those shiny wrappers hidden somewhere...if you don't then what better reason to go get some and discard the contents in some way...?


I knew this lot would come in handy!

What you will need:
Stamps - The Stamp Man Aspect Of Design 1 Floral; {Ippity} Totally Happy
Colouring - ZIG Writer pens; ZIG Calligraphy Pens
Papers - Sweet Wrappers; Card
Usual Suspects - Golden Soft Gel (Matte); Golden Heavy Gel (Matte); Gesso
Equipment - Sewing Machine; Heat tool; Cocktail stick; Scissors
Other - Sandpaper; Thread; Spray bottle of water; Big fabric brad;  ZIG water colour system BrusH2O 


Prepare The Sweetie Wrappers
Trim the wrappers, I just wanted the colour parts with the metal backing as this part of the wrapper is manageable and retains it shape when manipulated. Then lightly sand both sides of the wrappers.


Stick Wrappers To The Card Background
Use a piece of card as backing (look more package recycling!) start sticking the wrappers in a random order, I used Golden Gel medium and 'squidged' some of the wrappers a bit to get a good texture going. Allow it to dry.


It's Gesso Time!

It is out with the Gesso, a coat or two should do the trick. I wanted to be able to see the wrappers but I also wanted to add my own colour on top.

You can see the effect of the 'squidging' leading to a nice wrinkling of the background. Another nice effect is that some of the shine still pops through the Gesso layer where the sanding did not take.

Whilst you are at it Gesso a couple of spare sanded wrappers at set aside for the poppy.


Build Up The Colour

Cut out the tag and start building up the colour with the ZIG Writer and Calligraphy pens. I wanted to add more texture with the colour and one of the best way to do this is use the 'Scribble' technique

Scribble the ZIG pen onto the craft mat and spray with water to form droplets of colour. Press the surface to be coloured into the droplets to pick up the colour. 

I built up slowly, going from light to dark tones. You can use your heat tool between layers to dry the water but use it carefully as the wrappers are partly plastic and will deform in prolonged heat.


Add More Texture With Stamping
Stamp some more texture with the mesh stamp from the Aspects Of Design Floral stamp set. Cut out four poppy petals from your spare Gessoed wrappers and colour with
the 'Scribble' technique.


Stick the Petals Together

Use the Golden Heavy Gel, applied with the cocktail stick, to stick the petals into a loose poppy shape and I coloured a fabric brad black with a ZIG Writer pen for the flower centre. 

Whilst the poppy is drying it is time to add the finishing touches to the background.


Add More Texture With Stitch

By adding stem and leaf details. I used my sewing machine but you can easily doodle it or hand stitch it if you prefer. 

I then coloured the leaf and stem with ZIG Writer and Calligraphy pens using the ZIG water colour system BrusH2O and finished with the 'For You' sentiment stamp from the {Ippity} Totally Happy stamp kit.


Finish The Poppy

Finish the poppy by adding the brad and then shaping it with your hand before sticking the background with the Golden Heavy Gel. 

***

Your other half/child/flatmate/pet will be so pleased you have finally found a use for those discarded wrappers stuffed in that box/draw/sock/down the side of the couch.

Gotta love us hoarders!

Have fun with this technique and do come back to tell me if you have used it so that I can come and have a nosey!

Kimx


Pin It

Sunday 5 June 2011

Sunday Round-Up


Hi guys, I have a little showcase on the Gingersnap Creations blog at the moment - hope you like it! Thanks so much for all the lovely comments and encouragement about being the June Monthly Muse, you guys are fabulous!


Now I thought I would leave you with a little blog candy head's Up for the new Happy Daze Blog The Altered Ego. Moira is giving away a £30 gift voucher with free P&P so go check that out!

Big Squishy Sunday hugs
Kimx

Wednesday 1 June 2011

Gingersnap Creations June Muse


Hey Up Girls and Boys, 

I am very excited to be able to tell you a little bit of news I've been keeping under my hat for a while. I've been asked by the lovely Gingersnappers over at Gingersnap Creations to be their Monthly Muse for the month of June. 

I had such fun being a Visiting Artist last Summer that it is a real pleasure to be back this Summer as a Monthly Muse. Thanks Guys!

This month the Gingersnap Creations theme is Packaging and using packaging materials in your art and there are some fun challenges lined up, so pop on over to the blog to see what is in store for the next month and the first challenge is up and running - ready for you to get stuck in to!

I shall be back later in the month with some information, tutorials and projects that I think you will enjoy!

Have a fun Gingersnap Creations time!

Thursday 12 August 2010

Cute Card Thursday And Ippity

Some texture for you today, I always like to mix a bit of texture together. The challenge over at Cute Card Thursday is:

Tree-mendous!

So get your tree and leaf stamps out. My tree is from the gorgeous {Ippity} kit What Matters Most which you can get from {Ippity} Inspiration.

I've used a mix of Acrylic paint and watercolour pens and pencils to colour the tree and bird stamps.


The calico was coloured with Acrylic paints.


As I've used Acrylic paint for this card I thought it would be perfect for the Gingersnap Creations Spicy Supply challenge this month which is - Paints.

Have a Tree-mendous day you all.
Kim


Materials:
Colouring - Acrylic paints; Marvy Le Plume II Watercolour pens; Watercolour pencils
Usual Suspects - Paper trimmer; Silicone glue; Golden Soft Gel
Other - Calico; Acrylic Paints; Sewing machine; Bond-a-web; Corrugated card; Craft Vilene

Thursday 29 July 2010

Hitting The Right Note Mail Art

Got something a little different for you today, my mojo for cards seems to have taken a bit of a back seat at the moment so I thought I would have a go at some mail art - decorating an envelope.

This mail art is my last DT make as visiting artist for Gingersnap Creations and is for the Colour challenge:

Yellow, Orange and Red

I've used a collection of stamps to make this piece Ippity Bit of Burlap, stamps from the Ippity What Matters Most kit, the hearts from the Ippity Moon Beams and Heart Strings and Layers of Color Joyful Noise available from either Ippity Inspiration or from Make The Day Special.


I had great fun make this mail art, so you might be seeing some more!

Don't forget that you have a few more of days left to win some yummy stamps over at the Make The Day Special Blog.

Have a lovely day
Kim


Materials:
Stamps - Ippity Bit of Burlap; Ippity What Matters Most; Ippity Moon Beams and Heart Strings; Layers of Color Joyful Noise
Inks - VersaFine Onyx black; VersaColor vaious
Other - Envelope; Marvy Le Plume watercolour pens; Doily

Saturday 24 July 2010

Gingersnap Creations Random Redhead Challenge

Got some sunshine for you today for this month's Gingersnap Creations Random Redhead Challenge which is:

Sunshine

Something a little different for this card. I've used a recent photograph I've taken of my favourite flower, hope it brings a sunny smile to your face.


Have a sun filled day
Kim


Thursday 15 July 2010

Gingersnap Creations And Make The Day Special

What a difference a week makes. Last week was full of sunshine and warmth, it was beautiful. This week it has been wet and dark. I'm so glad that we had our staycation last week and not this week!

I have made a little picture for you today. I was having a play for my guest DT piece for the Gingersnap Creations Spicy Supply Challenge which this month is:

Markers

I've used my Marvy Le Plume watercolour markers to make this piece. The mini-frame is made from cardboard and coloured with the watercolour markers and a touch of pearlescent paints. I stamped the gorgeous Unity June Store kit butterfly available at Make The Day Special with the markers onto stamping board.


Thanks for popping in today.
Kim

Materials:
Colouring - Marvy Le Plume Watercolour Markers
Other - Pearlescent paints; stamping board; cardboard; PVA; Newspaper; Mod Podge

Wednesday 7 July 2010

Gingersnap Creations Theme Challenge

My first make as Visiting Artist for Gingersnap Creations and the theme is:

Heat

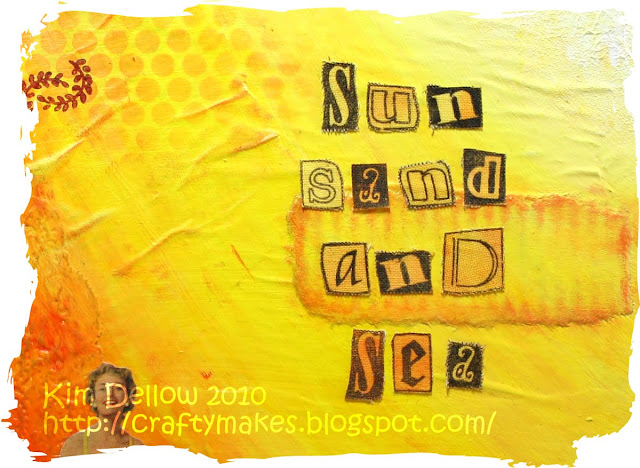
Oh the lovely Summer months, so nice to see blue skies and sunshine! So I thought I would go full on vacation feel for my make.

I've used multimedia techniques to make this Summer picture. To give you an idea of the scale you can see the make mid-production at this post here. It is 21x22 cm and I'm planning to make it into the front cover of a homemade sketch book for my multimedia playing.


I've added texture with newspaper, some corrugated card and if you look closely you will see a doily too. There was lots of acrylic paint, masking and stamping involved. Great Fun!


The image was saved from a newspaper, I could not help myself - I loved it and just knew I would use it somewhere!


So the Heat is on, don't forget to check out the fabulous challenge over at Gingersnap Creations!

Catch you later.
Kim


Friday 2 July 2010

Visiting Artist At Gingersnap Creations

I'm so excited! You might have noticed a new banner in the DT section of my sidebar? I'm tickled pink to say that the guys over at Gingersnap Creations have asked me to be one of their visiting artist for July - such an honour - thank you guys!

If you haven't checked out Gingersnap Creations then make yourself a cuppa and go have a peruse, you will be glad you did. Sharon and Ali, with their design team, have themed challenges, that last a month so plenty of time to get a make done LOL! But there is also loads more, with lots of inspiration, tutorials, techniques to help you expand your crafting - wonderful!

Right I better get on with my visiting artist pieces for the month LOL!
Kimx


Wednesday 23 June 2010

Mad Hatter's Tea Party

Today I have an Alice in Wonderland themed card to show you and this one is my contribution to the Gingernap Creations Mad Hatter Day Blog Hop celebration.

The blog hop started on the 10th June - I'm late, I'm late for a very important date! But wait a minute - is that 10/6? As in the Mad Hatter's hat ticket?

Well yes! Now you can see the reason for the Gingersnap Creations blog hop theme! If you hurry on over there you can join in the fun too and there are prizes - yummy Alice prizes!


My little Mad Hatter is from The Greeting Farm Digi-stamp and the Cosmo Cricket papers, Prima lace and chess charm are from Quixotic Paperie.


But I have more news - I'm blown away to have been Ginger Gemmed for my entry into the recent burgundy, ivory and black colour challenge. Thank you so much guys!


Talking of blog hops, Make The Day Special will be having a blog hop this Saturday (26th June) so another important date for your diaries :)

Don't be late!
Kim


Materials:
Colouring - PrismaColor Pencils; Sansodor
Usual Suspects - Paper trimmer; Silicone Glue; Double-sided tape
Other - Prima Lace; Chess Charm; Button; Computer; Printer

Wednesday 9 June 2010

I've Been Gingersnapped Again!

The lovely DT over at Gingersnap Creations have picked my entry for the GC54-Pencils challenge for the Ginger Gem selection. Thank you so much guys, you have just made my day!


Sunday 30 May 2010

Tiddly Inks Meets Gingersnap Creations

Sunday make coming right up! Today I have a card that fits two challenges - well look at me with the two challenges and everything!

The image is from Christy Croll's Gothic Cute range at Tiddly Inks and the challenge over at the the Tiddly Inks Challenge blog is all about the bling (see the bling bottom right hand corner LOL!). The colour inspiration is taken from this months Colour Challenge over at Gingersnap Creations.


SO what do you think of the photo? Do you think it is focus? Still trying to work out the new camera.

Oh and ice cream update...there is a bit of a dent in the tubs now - Tee hee!

Happy Sunday you all.
Kimx


Materials:
Colouring - Copic markers
Usual Suspects - Silicone glue; paper trimmer; double-sided tape
Other - Cuttlebug; Embossing folder; nail file; Lace Ribbon; button; sewing machine; sticky gems