Showing posts with label Stitch. Show all posts

Wednesday, 17 June 2015

Hillarys Craft Competition 2015: Under The Rayna Apple Tree

I do love a bit of stitching. It is one of my favourite things to do so when I heard about the Hillarys' Craft Competition I jumped at it! Yay, an opportunity to get a bit stitchy!

Under The Rayna Apple Tree

The call went out and everyone who wanted to have a go could choose one of four fabrics.

Hillarys Craft Competition Rayna Apple

Out of all the designs, the Rayna Apple shouted out to me; I think it was the lovely lino-print-style flower design, I just love it! So what to do? Lots of ideas rattled around my head for a good long time but I could not narrow down on one that I was happy with. But I knew I wanted to match the fabric up with a wicker gift box that was lying around my room waiting desperately to be used for a project.

Finally the idea come to me – a mixed-media, three-dimensional tree scene that I'm calling 'Under The Rayna Apple Tree'. I wanted to keep true to the nature theme of the fabric so this felt right for my make. Yay! At last!

OK, but how do you make a 3D tree from fabric?

Making a 3D tree from fabric

Mmm? Good question!

I thought about it for a bit (picture a quizzical look on my face and a lot of head scratching) then decided that I would use a quilting technique I quite like to do from time to time. I wasn't sure if it would work but I thought I would give it a crack!

I layered up some rectangles of fabric such as the Rayna Apple Fabric itself with calico, a bit of Hessian, some muslin, just oddments of fabric and even a couple of old book pages for good measure. I added a little bit of wadding then added the Rayna Apple Fabric again for the top layer.

Free-motion quilting a 3D tree

Next it was a matter of stitching the layers together with some free-motion quilting. I 'drew' the lines of stitch in a vaguely bark-like fashion for a bit of extra tree texture. I then added several lines of stitch along the top and bottom areas of the trunk and trimmed the fabric to the lines, leaving some tails to turn into roots at the bottom.

When the stitching was finished, I roughly rolled the quilt into the tree trunk but I did not want the trunk to look like a uniform tube. It really needed to be more organic than that so I just used a single holding stitch in the middle of the back to give an uneven tree-like appearance to the quilted tube.

To make the quilt even more tree-like, I slashed a hole into the surface and through the layers to peel it back for the little tree trunk hidey hole. Now you can see way I used so many different layers in the quilt, can't you?

So far, so good! I love it when a plan comes together.

Making tree leaves from the Rayna Apple fabric

The Rayna Apple Fabric already has its own leaves. Perfect! So I used those leaves already in the surface design and a few from the flower heads too. I just added a craft felt fabric stabiliser to give the leaves a stiffness and cut them out and layered them on bigger leaf shapes cut from fabric, Hessian or book pages. I had some rusted wire in my stash that I thought would make great branches to attach the leaves to the trunk and I threaded each leaf with the wire and curled the ends with pliers.

The wires easily pushed down into the centre of the tree trunk and I added a little bit of Golden Heavy gel to keep them in place.

Making a swing from a lollipop stick

But before I placed the last branch in the trunk, I made a little swing to go under the Rayna Apple Tree using a wooden lollipop stick and some silver findings and chain. I gave the swing seat a touch of red paint and lightly distressed the silver chains with alcohol inks to give a more worn look to the swing. Then I threaded the swing onto a branch and stuck the branch in place in the tree.

The Swing under the Rayna Apple Tree

Once the leaves were vaguely in place, I rolled and stitched the tails left on the trunk to make the roots and used more Golden Heavy Gel to stick the tree into place in the wicker basket frame.

That's how my whimsical piece of art / home décor using the lovely Rayna Apple fabric came into being and what fun it was to make. I have hung it on my studio door and I just love the way the swing moves as the door moves.

Under The Rayna Apple Tree in place on my studio door

Everyone has been really busy with their Hillarys Craft Competition makes and you can see them on the Hillarys Pinterest board so do go take a look!

Have you been up to any stitching recently? Are you entering the Hillarys Craft Competition? I would love to know and take a peak at your make. Do drop me a line!

Catch you later Stitch-inators!

Kim


Monday, 11 May 2015

Mixed Media Greeting Card - Something Old Turned New

I think I might have a problem! I can not throw anything away.

Ok so we haven't quite made any of the Hoarders Are Us programs on the telly yet but sometimes I think it might be close. I reckon you can empathise with me can't you? I mean it is a bit of a crafters' disease isn't it?

Since the move last year I've been trying to streamline my studio space a bit and recycle what I can and get rid of unusable items. I was going through a box of bits of paper and experiments when I found these two items:

Some fabric and card work

I think I was experimenting with texture pastes and masks when I made these.

The heart was a crackle paste experiment on fabric. I've tried lots of different crackle pastes and mediums in my time, I think it might be the Golden crackle paste but I know how picky Golden crackle paste is about its substrate so it might be an embossing paste, not sure. Of course any sign of a label has gone - I so should have stuck it in an art journal.

Close up of a crackle paste heart on fabric

But I do know, by the pen work, that it was done when I was DTing for Kuretake so maybe from 2012 or 2013 - I told you I hold on to things!

I don't think I ever meant to make anything from them but for some reason when I found them they just spoke to me.

And so from something old...

A mixed Media card

...a new card is born. Now if it only had something digital as well I could have linked it up to the new Old, New and Digital Too blog. Mmm... work in progress! Go check the new challenge out btw.

But I digress!

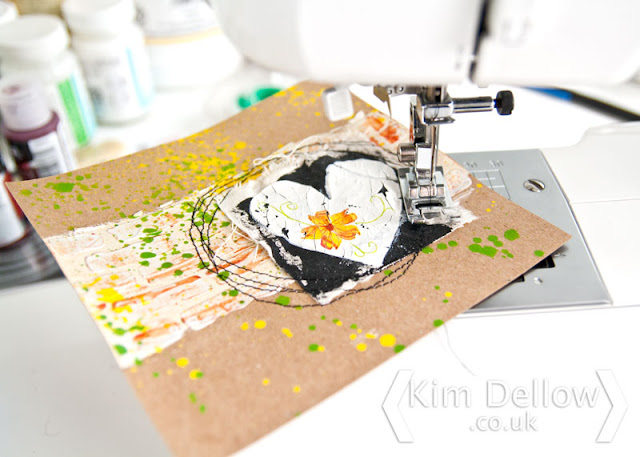
The new elements added were a little bit of stitch.

Stitching on the mixed media card

Some colour using items from the DecoArt Media range. For the drips I used the sprays which I'm loving by the way, they are quite different from other sprays I have used, I might have to do a blog post about them if I get the time!

DecoArt Media misters

Finished with a bit of stamping with Ranger Archival ink and one of my favourite Kaisercraft texture stamps.

Close up of the mixed media card

So that is me, starting the week with this mixed media card.

Thanks for popping by and I hope you have a lovely arty, crafty Monday.

Kim

Kim Dellow Blog post signature

Tuesday, 14 April 2015

Say It In Fabric New Baby Card

Every now and then I love to breakout my sewing machine and get all stitchery. So when I was asked to make a new baby card I decided that it would be fun to do a little faux free-motion machine embroidery.

Faux Free-motion machine embroidery card

I do love drawing with a sewing machine, it is such a gorgeous technique. With real free-motion machine embroidery you go off-road so to speak. You either don't use a foot at all on your sewing machine - watch your fingers! - or you get one of those 'jumping' feet (that's what I call them!), you know the quilting or darning ones that lift off with each stitch so that you can move the fabric freely.

What I call faux free-motion machine embroidery is where you draw with your sewing machine but you use it just as you would to sew a seam with an ordinary foot. It does require a bit of patience and some use of the sewing machine's flywheel but it is nice halfway house if you are a little worried about going completely off-road.

Close up of the faux free-motion machine embroidery new baby card

This scenic baby new baby card was made using the faux free-motion machine embroidery techniques and fabric.

All the elements use stitch, the lettering, spot on the ladybird all of it. However, the inside and the envelop where stamped with a stamp from Clearly Besotted Stamps but they seem to have discontinued the stamp set, which is a shame 'coz it was super-cute.

Matching stamping inside a card and on the envelop

Do you ever use your sewing machine to draw your designs and not just stitch a border with? Is it something you would like to do more of but aren't sure how? Are you a fan of the free-motion machine embroidery? I would love to know so do drop me a comment if it is something you would like to know more about.

Catch you later stitchinators.
Kim

Kim Dellow Blog post signature


Tuesday, 18 March 2014

Book Review - The Maison Sajou Sewing Book By Lucinda Ganderton

Book Review - The Maison Sajou Sewing Book by Lucinda Ganderton Published by Ivy Press ISBN 978-1-78240-085-1


Hey guys, I have my thoughts on another stitchery book published by Ivy Press to share with you today. If you have been reading my blog, you will have caught two lovely books from Ivy Press so far, with the Sew Quick, Sew Cute By Fiona Goble full of super cute projects and Sewing With Letters by Nicola Tedman & Sarah Skeate which was full of fabulous typeface inspiration.

This week it is the turn of The Maison Sajou Sewing Book by Lucinda Ganderton another lovely book full of fabulous inspiration that won't disappoint if you are a stitchery fan.


The Maison Sajou is the passion of Frédérique Crestin-Billet and is the brand name of a nineteenth-century French haberdashery that Frédérique has relaunched and built up from her love of French vintage embroidery and paraphernalia. 

The book contains information on materials and techniques with plenty of tips for embroidery enthusiasts. There are also twelve pages of stitch instruction for the various stitches you will need to embroider the projects, and each stitch has at least one diagram of the stitch and in some cases diagrams of each step of the stitch which is very useful if you don't have an embroidery stitch dictionary. 


There are 20 projects in the book all designed by Lucinda Ganderton, the needlecrafter and craft book writer, and as she says in her introduction to the book she wanted traditional projects for the stitcher, the home and the family but with a contemporary spin. 

So you will find projects like a tote bag, tablecloth, sampler cushion and a gadget case included in the mix. All the projects are stepped out with diagrams and instructions for each stage of the making. A beginner could find projects to inspire them from this book but there are also projects with the more experienced embroiderer in mind as well.


But above all I will tell you what my most favourite thing is about this book: Lucinda has included her inspiration or mood boards for some of the projects, which I just love to see. 

As someone fascinated with the creative process, I love seeing the inspiration that triggered an idea and I think it is a great addition to the book and adds even more inspiration and interest to the projects themselves.


The book is hardback with 192 pages, it measures 27 cm x 19.5 cm and is 1.8 cm thick and retails at around £19.99. It is a beautiful read and if you are an embroidery fan or a stitcher wanting some embroidery inspiration to finish your projects then check out this book.

You can find it at Amazon.co.uk or at Amazon.com and if you have it already I would love to hear what you think about it, so do drop me a comment.

Kim


[Disclaimer Time: This is a sponsored book review so I received a copy of the book to review but as with all my blog posts I always try to give you my honest, unbiased opinion. (Prices correct for the date the blog post went live)]

Tuesday, 11 March 2014

Book Review - Sewing With Letters by Nicola Tedman & Sarah Skeate

Book Review - Sewing With Letters by Nicola Tedman and Sarah Skeate Published by Ivy Press ISBN 978-1-78240-087-5


I've got another sewing book from Ivy Press to share with you today and this time it is Sewing With Letters by Nicola Tedman and Sarah Skeate of Zombie Felties and Steampunk Softies, amongst other books, fame. So just as with the Sew Quick, Sew Cute book I reviewed in January and which is also from Ivy Press, this one is full of fun and cute projects but this time it is totally focussed around adding lettering, words and playing with fonts in your stitchery. This is one of my favourite art subjects as you know if you have seen some of my Papercraft Essentials articles from the end of last year, so I was super excited to get a peak at this book from Nicola and Sarah.


There are 20 projects in this book and they are more focussed around the lettering than the actual projects as you might expect from the title. Projects include things like a picnic blanket, apron, doorstop and some fun ampersand bookends to name just a few.

There are plenty of techniques and inspiration for how to add lettering, including techniques like stencilling, appliqué, ribbon work techniques and stitching. The projects themselves didn't fully inspire me personally, but one or two might get made: the Cafe blind will come in useful and I did love the ampersand bookends. However, the lettering definitely rang all my bells and I will use these techniques on some of my own projects. For the lettering inspiration alone the book is well worth adding to your stitchery craft library.


The book is nicely presented with lovely photography, professional-looking projects and step-by-step sketches to take you though the making of the projects. There is a small paragraph on the history of each of the typefaces used, with some examples of how the typeface looks which are fabulous touches and again appeal to my typeface-nerdity.

The book also includes lettering templates and a small section on materials and techniques but it doesn't go into full details to help a stitching beginner. With this in mind, I would say that the book would be great for an intermediate sewer who already knows the stitching basics and is happy with sewing machines and embroidery hoops, or a seriously confident beginner who likes to push herself out of her comfort zone but generally can do anything she turns her hand to might also want to take a look. Some of the projects need more common sense than skill but others do need a bit of stitchery experience to get a professional finish and not to look like your 4 year old did it (unless of course your 4 year old is a stitchery genius!).


Sewing With Letters is a 128-page paperback book with cover flaps and measures 25 cm x 20 cm and has a recommended retail price of £12.99. You can find it at Amazon.co.uk or Amazon.com.

Kim


[Disclaimer Time: This is a sponsored book review so I received a copy of the book to review but as with all my blog posts I always try to give you my honest, unbiased opinion. (Prices correct for the date the blog post went live)]


Friday, 31 January 2014

Book Review - Sew Quick, Sew Cute By Fiona Goble

Book Review - Sew Quick, Sew Cute by Fiona Goble Published by Ivy Press ISBN: 978-1-78240-088-2


It's book review time and I really do have a super cute stitchery craft book to share with you today, and they really don't come any cuter than this! Well straight off as soon as I opened Sew Quick, Sew Cute from Fiona Goble I found projects I wanted to try. There is a large range of sewing projects in this book from toys for babies to clothes for you and your family through bags, and even footwear, all of them very simple makes with the time-challenged in mind. Yep that is all of us isn't it? 


There are thirty projects, described on the cover as 'Simple, Speedy Projects' and they certainly are, but the beauty of them is that even sewing-beginners can dive into this book, get started and hopefully build confidence in their sewing skills. 

For those with a high degree of sewing skills, you might find these projects too simple and probably would not need help putting the projects together. For me, I would class myself at an intermediate sewing level (I can make clothes from a simple pattern, I know my way around a sewing machine and I *LOVE* sewing), and there are definitely projects that I want to make from this book. I found reading through the book quite inspiring. I think it is as much about a look as it is the project ideas and with some clever fabric choices, the projects tap straight into the current looks and trends in the sewing crafts. 


The book starts with a page of tips on what tools you need to make the projects. Next there is a page talking about the different fabrics you will need. Then there is a two-page spread about some of the basic sewing techniques you will be using, such as how to do a topstitch, how to clip curves and corners etc. It also gives tips on how to prepare the templates and all the templates are provided with the projects where needed and each project comes with an estimated time it will take to complete the project.

The book itself is beautifully presented with great project photography and clear step-by-step sketches rather than photographs. It's a paperback, with cover flaps, of 144 pages and measures 25 cm high by 20 cm wide and it has a recommended retail price of £14.99.


You can find Sew Quick, Sew Cute on pre-order over at Amazon.co.uk or Amazon.com and it is due out in the first week of February.


Happy Stitching!

Kim

[Disclaimer Time: This is a sponsored book review so I received a copy of the book to review but as with all my blog posts I always try to give you my honest, unbiased opinion. (Prices correct for the date the blog post went live)]


Friday, 29 November 2013

Buttonbag Christmas Advent Calendar Kit Review

Review time! Are you looking for a DIY Advent calendar but you are a complete crafty beginner? Then this might be right up your street. It's the Christmas Advent Calendar craft kit from Buttonbag available from John Lewis


Now this kit involves a bit of stitchery but you don't need a sewing machine and you get all the fabric, threads and needles you need to complete it. You get a 48 x 80 cm printed cotton panel that acts as the backdrop that you then stitch the 24 different coloured felt squares to make the little pockets to fill with toys or sweeties or whatever you want. The toys and sweeties aren't included though! 

You get a rainbow of embroidery thread that you can use to decorate and stitch on the pockets with. There are also some ordinary threads in three colours plus black and white, some pins and a single snap fastener, I'm not really sure why that is in there...answers on a postcard...erm?


Also in the box are four large rectangles of sticky-back felt to make the decorations with. There are some shapes, numbers and an alphabet printed in the accompanying leaflet that you can use as templates. The leaflet also has the instructions and a rundown of Buttonbag's other craft kits you can buy. Finally in the box you will also find a little strip of twill tape, which you can make hooks to help hang the calender with.


The box is nicely presented and the contents are good quality. You get a lovely range of colours with the pockets and the embroidery thread, which is nice and there are a few options of the sticky-back felt too.

The back cloth has some lovely snowflakes and stars printed on it, but I have no idea why as you cover them all up with the pockets you stitch on, which is a real shame. But I suppose that does mean that you don't have to use it as an advent calender if you didn't want to, you could use it for a countdown or some other fun pocket-filling use. Perhaps as a bribe incentive mechanism for getting chores done?

I suspect, although I haven't tried it, that it might prove a little hard to hang up and you may need to add three hooks to the calendar rather than the two suggested in the instructions. You may also need to get some hooks that attach to your door or wall to hang it up on and you might also want to just fill it with things that are light. I would also be wary of stitching into the gummed felt as it might leave the needles tacky and impossible to use on the rest of the make, cutting it might be a pain too.


The kit is extremely simple: all you really need is some common sense and to know how to thread a needle and how to stitch a basic stitch to complete it. If you don't know anything about stitching, there are no instructions on how to sew, but then that is what the internet is for. 

If you are an experienced stitcher then you will find this kit too basic for you and you probably have all the threads and felt you need stuffed away in a draw some where don't you? You could always use things that aren't in the box to decorate your advent calendar and practise some of your embroidery stitches to add some interest. 

This would be a good kit for beginners so it would be good for crafty children or for a totally non-stitchy or non-crafty adult who wants to make a handmade advent calendar and doesn't have a collection of fabric scraps and threads lying about. 


The Buttonbag Christmas Advent Calendar retails at £16 and you can check it out, plus other Advent Calendars, over on the John Lewis website.


I would love to know if you have an advent calendar this year, did you make it yourself? Or do you have this or any of the other Buttonbag kits? I would love to hear about them.

Catch you later.

Kim


[Disclaimer Time: This is a sponsored review but as with all my reviews I always try to give you my honest, unbiased opinion. (Prices correct for the date the blog post went live)]

Saturday, 28 September 2013

Some Mixed Media Art Journalling - Voices

Hey guys, how do you fancy a project that I started a few weeks ago but finished yesterday? It is a journal page using fabric and paper combination with some stitchery and texture. It is my Creative Expressions piece for the week.


So it A4 sized and the fabric is denim, but I'm sure you had guessed that already hadn't you?

There are several layers to this piece, Khadi papers, Denim, old book pages and card. The doily is the Couture Creations Dazzling Doily Die from the Fantasia Collection cut from card.


I've used clear Cosmic Shimmer Texture paste mixed with a little bit of white acrylic paint through the great That Special Touch Peacock Mask, I think I've already mentioned how much I love this mask so it does get reused a bit! I've added touches of Creative Expressions Enchanted Gold and Spring Green Gilding Wax to the textured area too.


I've used the Gilding Wax on some of the stitching too. By the way have you spotted the Solvent Blending Solution for Gilding Wax? I've not tried it yet but I will soon. I believe it helps soften and manipulate the wax.


The focal point uses stamps from the Tim Holtz Classics 4 Stamp Collection and the colour is the beautiful sparkle of Cosmic Shimmer Misters.

Thanks for popping in and have a fun Saturday.

Kim