I have been putting the Cricut Explore through its paces this week and what a fun week it has been. The more I do the more I want to do! Yep, definitely loving this machine. So do you want to see what I have been up to? I'm going to share a few Cricut Explore DIY project tutorials with you this month starting with this...

[There are some affiliate links in this blog post, so if you buy through them I do get a small amount of money at no extra cost to yourself. Thanks for your support!]
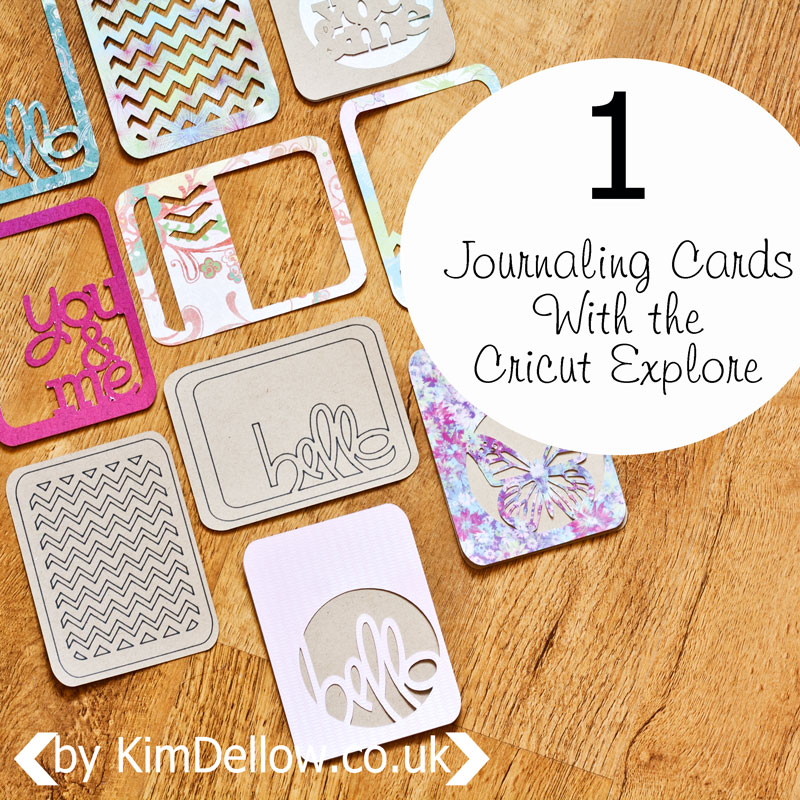
DIY Journaling cards, project life cards, journal cards, or whatever you like to call them, are super simple with the Cricut Explore and once you have started you ain't gonna want to stop!
You will need:
Patterned paper
Cardstock
Cricut Design Space
1. Open up the Cricut Design Space and login, if you aren't logged in already. Start a new project and insert a square (I used #M46C02) and then make both layers visible and resize the shape to 3 inch by 4 inch. Ungroup the shape and resize the nested journal card shape to approx 2.45 inch by 3.45 inch.
If you have used a square that doesn't already have a layer then just copy and paste it, then resize the copy to fit inside the first.
2. Once you are happy with your journaling card sizes, select both shapes by clicking outside the shape and holding the left-hand mouse button down to drag the select box over both shapes, or by clicking on the shapes in the 'Layers' window and holding the CTRL button as you select both shapes (sorry Mac users, I don't know if this is the same for you guys).
With both shapes selected, either right button click and select 'Weld' from the drop-down menu or use the 'Weld' option in the 'Layers' window.
Ta-da! You have a border / frame!
3. You can now put in it all sorts of things! Go on have a go! I was looking for words for my journal / Project Life cards. You can of course write them yourself with the 'Add Text' option; remember, you can now use all the typefaces you already have on your computer - Score!
But for mine I thought I would use some of the word art already in the Cricut Library, so after clicking the 'Insert Image' button, I searched for 'hello' and spotted #M3049A.
4. Move and resize the word to fit the journal card frame, then select all the shapes and weld them together.
OK, so that is pretty cool. But this next bit is way cooler! Copy and paste your new card and click on the little 'Cut icon' circle on the copied hello journal card layer in the 'Layers' window. A little side window pops up with a colour palette and three little icon circles at the top in the 'Line Type' option. Click on the middle icon that looks like a pen nib.
It's magic! You have just converted your die-cut journaling card into a written journaling card!
5. To make it into a complete journal card that cuts out, just make another journaling card blank, just as before, size it to 3 inch by 4 inch and resize the written design inside, then select both the blank card and the nested written design and either right button click and select 'Attach' or use the 'Attach' option in the 'Layers' window.
There you go - it's a written journal card ready to cut and write.
There you go - it's a written journal card ready to cut and write.
MASSIVE TIP: Whatever you do, make sure that you save regularly whilst working on your projects in Cricut Design Space! Yeah, I found this out to my cost when they did some maintenance work on the website but had only let folks know through Facebook *sigh* #notahappybunny. Really hope they start using in-program warnings for those who aren't looking at their Facebook page at the right time!
But all is forgiven 'coz look at all these...
Oh yes, I might have gotten a bit carried away!
Oh and another super tip...something looking familiar about the pens below?
You get a silver medium nib Cricut pen with your machine, and I've been really lucky and got sent some more of the metallic pens which I am super grateful for, but I really needed a black thin nib pen - I know, so ungrateful! Then I realised that something looked really familiar about the pen that came with the Cricut Explore, it is the same design as some of the American Crafts pens. So if you have some Slick writers or Galaxy markers, they will work beautifully! YAY!
Having said that, I have so got my eye on the Cricut Antiquity Colour Pen Set, love those colours!
I'll be back next Friday with another Cricut Explore DIY tutorial so do drop on by and in the meantime let me know what you want to do with your machine. What will be the first thing you will make?
Catch you later.
Kim

Like this? You might also like:


