
It's What's On Your Workdesk Wednesday (pop on over to Julia's blog to find out more) and on my desk I have:

Some bits and pieces to recycle into art!
I have a tutorial to share but for the WOYWWs feel free to hop on to the next person!
*****
*****
A number of folk have asked about how I make the backgrounds that I've been using in recent makes so here you go folks!
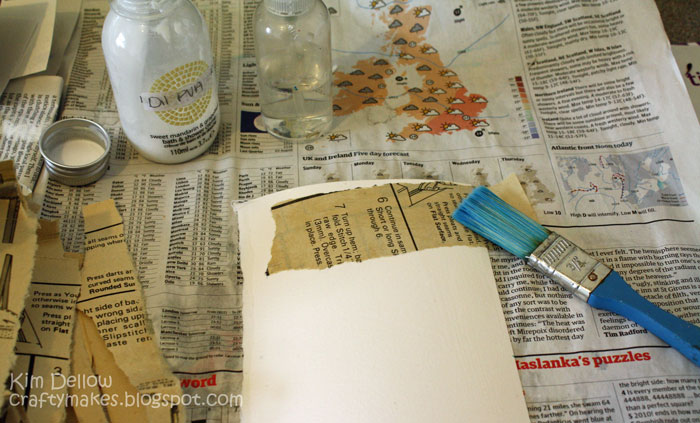
The photo above gives you a clue at some of the things I use for my backgrounds: old books, music scores, maps, magazines, newspaper, telephone books, old dress patterns. You can use this technique on all sorts of bits and pieces.

What you need is your collage material and a base card to work on; I use old scraps, and the thickness will depend on what you subsequently want to use the piece for. As a starting point try some card of over 240gsm to play with.
I have a dedicated glue brush for all my glue work, a little nylon bristle paint brush. You want to dilute some PVA to the consistency of single cream, I usually store mine in an old bottle. You might also want to have a mini-bottle of water to hand and to work on a plastic sheet.


I've torn my collage materials into strips; you can make the pieces as small or as big as you want but bear in mind what the final piece will be used for and, if it's going to be something small, you might want to make the collage pieces small otherwise you won't get that lovely texture of the torn edges.

To start, spread a layer of the diluted PVA over the base card and don't let it dry, you can always spritz with water to keep it moist.
Start adding your strips of collage materials to the wet base card and brush more diluted PVA over the top. If you are working with collage material that is glossy or thick, it is a good idea to brush the underside with diluted PVA before putting onto the base card. You want the collage pieces to be pretty saturated with the PVA.
Everything is going to get pretty wet and pretty sticky! But that's the fun bit!
I add my pieces as randomly as I can and not really worrying which way around the collage piece is.

So keep adding bits to the base card, with a layer of diluted PVA, then a new strip of collage material and a layer of diluted PVA over the top and, if you need, spritz with water if you think areas are drying or add more diluted PVA.
If you are working on a plastic sheet then once the card is dry it should just peel off of the plastic. But I often peel mine off whilst wet and dry it on the top of some flat-topped paint bottles. It will take a while to dry, often taking overnight, but you can help it along with a heat tool if you are that impatient!
Need some more ideas? How about...

Use your collage with distress inks

Use your collage with paints

Use with watercolour pens like the ZIG Art and Graphic Twin from Kuretake

Using textured card, like corrugated card, as the base card

Pass the collaged card through a die-cutting machine in an embossing folder

Use fabric as the collage pieces
Yep, the possibilities are endless and I can't wait to see what you do!
Have fun
Kim

Pin It
TFS this technique.
ReplyDeleteToni :o)
OOH i have one of those twinchies
ReplyDelete:0) great tutorial Kim .
Kate x
Love your little collage pieces! Gorgeous colours ...
ReplyDeletethese are great techniques. thanks for sharing!
ReplyDeleteFabulous tutorial, thanks for sharing. Must try some of these tips.
ReplyDeleteNice desk , thanks for sharing!!
ReplyDeleteLove your tutorial!
Happy Wednesday;-)
Great tutorial - and I am going to have a play too.... I have loads of old books to rip apart... thanks for sharing - happy WOYWW
ReplyDeletelove the collage work tutorial
ReplyDeleteThank you for sharing with me on WOYWW
Vicky #88 30.3.2011
http://angeldrummer.blogspot.com/
great tutorial Kim, Love the end effect. Best regards, Janine
ReplyDeleteHi Kim,
ReplyDeleteLove old books and papers too - can't get enough of them. Love to collage too - but need to be more careful with my page choices. Had a few rude words appear on my dictionary pages and saucy excerpts turn up but that was down to Lady Chatterly's Lover...
Great that you did a tut so that people will give it a go!
Thanks for sharing your workdesk today. Wishing you lots of creativity until next time!
Sasa (Sarah) at 1
http://blueboxbabe.blogspot.com/
I really love the effect of collaging, it makes such stunning backgrounds xxx
ReplyDeleteVery simple to follow tutorial - will give it a go.
ReplyDeleteThanks for sharing
Happy WOYWW
Rebecca (41)
I love this technique, like you say its sticky but fun :D
ReplyDeleteLove the other language papers, guess it's time to hunt on ebay for some old books lol
StAy InKy
hUgS MiNxY #48
Just the kind of sticky fun I love! I keep pile of books purely for ripping up...which given my massive love of books seems weird, but it works for me!
ReplyDeleteThis is fabulous, thank you, I reaally want to have a go,I do keep sort of having a go, but the papges never seem to turn out right, it still looks like what it is, ripped paper! But!!! I will survice! (I'm not sure if that's the right word)
ReplyDeleteHappy WOYWW!!
((Lyn)) #51!
I'll be back to study this when I have more time as I'd love to have a go at your background techniques! TFS your creativity with this lesser mortal, Jo x
ReplyDeletegreat technique, love your tutorial, I have to hide the book that I tear pages out of as hubby collects old books and won't part with a single one! I think he would cry and try to come and rescue your books if he saw this!
ReplyDeleteHappy Crafting, Debxx
Hi Thanks a lot for this one! Love, kissinia
ReplyDeletefantastic tutorial kim.its looks good messy fun.i have got to have a go at this asap :D
ReplyDeletexx coops xx
Thanks for sharing! I will have to dig out the old phone books and such and have a go at this!
ReplyDeleteStar 117
Thanks for the peek and sharing. Have a great WOYWW
ReplyDeleteHugs Marjo #22 oops thats 23
Very nice tutorial on making the collage. I will have to try it! Thanks for sharing! Vickie #83
ReplyDeleteLove your wee tutorial hun,i do something very similar love the way youve showed the different techniques.Happy creative Woyww
ReplyDeletehugs judex6
Great post, thanks for the tutorial it is always a technique I admire but just never get around to doing it. Nice to get a clear pic on how to get started.
ReplyDeleteGreat tutorial and very easy to follow! TFS
ReplyDelete