Showing posts with label Stitch. Show all posts

Saturday 22 October 2011

Prima Meets The Quixotic Paperie Sketch Challenge

Hey Guys, have you played along with our first Sketch Challenge over at the Quixotic Paperie Blog yet? It's a great sketch from Mary and if you play along you could win a £15 gift token to spend in Quixotic Paperie or see your work on the blog.

Well here is my take on the sketch, I've used paper from the Prima Marketing Alla Prima pack and the Prima Marketing Londonerry cling stamp set for this card.


The stamping uses the Archival Coffee ink pad.


A little bit of stitchery, a bit of tearing, some mulberry paper and embossing for this make.


If you want to see the sketch then pop on other to the Sketch Challenge post, there is more inspiration with this fabulous sketch here on the blog and on the design team's blogs (listed in the sidebar).

Have fun with the challenge and have a lovely Saturday.
Kim

Friday 21 October 2011

You Are My Type Of Friend

Some grungy colour for your fabulous Friday!

I've got my Creative Expressions make today and after all the Clean and Simple cards I've been doing I thought I would get down and inky for this one.


The sentiment is from the Vintage Typewriter Stamp Set.


The swirls are from the Funky Floral Stamp Set.


I've used Tim Holtz Distress inks from Ranger to add the pinks and purples.

Well I hope you enjoy your grungy Friday doing whatever you do on a Friday!

Catch you later.
Kim

Saturday 17 September 2011

Fun With Fabric And Octopode Factory

Ahh Saturday, which means it is my day on the Quixotic Paperie blog and I thought that for my DT piece this week I would get all a bit fabric-y with the fabulous Ocotopode Factory stamps, new into Quixotic Paperie, and some yummy Prima papers.


I've used Octopode Factory Alice from the Alice in Wonderland range and made her a little quilted.


I've used the Octopode Factory Small Button Flower and the papers I've transferred onto the fabric are from Prima.


I've also used EZ Mount and Ranger Archival Jet Black which are both available in the  Quixotic Paperie shop


The paperclip was from Paperchase, or perhaps WHSmith, you know I don't remember! I'm just a stationery hoarder. 


I've also used a bit of black ZIG Fabricolor Twin pen on the make too.


This one just kinda made itself, I started with the idea of transferring the Prima papers onto fabric and wanting to make something with the Octopode Factory stamps and the rest just developed in front of my eyes LOL!

It was great fun to do!

Hope you all have a very creative Saturday.

Catch you later
 Kim 


Saturday 10 September 2011

Spooky Saturday

Another Spooky make for you all today and this one is my DT make for Quixotic Paperie. Going all Halloweeny at the moment! You don't need to look away as there are no spiders on this one but there is a gentleman Skeleton! He is from the Artistic Outpost Haunted Halloween stamp set and when I first saw him I knew that I had to have him!


I've matched him with the fabulous Echo Park Apothecary papers and some chaotic stitchery.


If you look carefully you might see that the sentiment, also from the Artistic Outpost Haunted Halloween stamp set, is in fact hanging from a thread and is free to swing eerily around the front of the card.


When you pick up your Artistic Outpost stamps don't forget to get some EZ Mount as well.


ps. I've linked this up to the Artistic Outpost September referral program and whilst you are there also check out their lovely stuff.

Have a super scary Saturday.
Kim

Monday 5 September 2011

La-La Land Crafts Inspiration Monday

Hey Hey! It's La-La Land Crafts Inspiration Monday! This week the inspiration is 'anything but a card' so for my DT make this week I've made a little mixed media tag which is probably a bit of a cheat as I really do love making tags so do quite a lot of them!

I've used La-La Land Crafts Skeleton Luka for my spooky Halloween make.

You can get him as a Rubber Stamp or as a  Digital Stamp


I've added a free-stitching spider web,


with a button Spider! (The best kind in my opinion!).


If you like the background I've made then keep an eye out for the tutorial to follow!

Well as always there is more Inspiration on the La-La Land Crafts blog today and again
on Friday.

Have a great Monday.

Kim


Saturday 3 September 2011

Art From The Heart Birthday Celebration Blog Hop

Welcome the Art from the Heart 10 year Birthday Blog Hop Celebration


Lots of exciting things will be happening at Art from the Heart next weekend. To find out more  about all the celebratory events then pop on over to Dy Reaveley's Blog Art and Soul

In the meantime there are FIVE product themed Blog Hops for you to while away the time with in preparation for the big event!

If you have hopped to my blog from GezzyB's Jots then you are on the right path for the Stampotique Team's blog hop. If not then pop back to Dy's blog to start.

I've got a little mixed media jotting book for my make, it uses one of my favourite
Stampotiques - Karin.


I called the book 'Threads of Ideas'.


The idea being that it is a book to capture all those ideas before they unravel!


Before you move on - you will need to collect a letter from me which is: I


This is part of an anagram of a Stampotique product
and you can find out all the details over at Dy's blog which is your next port of call after leaving me a comment of course LOL!

Happy Hopping.

Kim

Saturday 6 August 2011

Someone Is Watching You!

Do you have that feeling like someone is watching you? Well they are! LOL!

I'm super late today with my Quixotic Paperie post, I've literally just finished it and high-tailed it over to the blog to get it all posted! Phewee it is hot off the presses!

It is a little sample, I'm calling it that because it was meant to be an ATC but it turned out just a smidge too big to be classed as one. I've used two of my favourite stamp sets from the Artistic Outpost range - Steampunk Set and the London Underground Set


The background was stamped over rusted fabric with Archival Coffee ink pad.


Quick he has just looked away...


You can sneak off now!

BUT before you do don't forget to check out the Quixotic Paperie Design Team Call and the Sale!


Kim


Friday 5 August 2011

Some Page Altering - In The Deep Blue Sea

Something a little different for a Friday and my Guest DT piece for Alter It Monthly. This month's challenge is 'Sirens, mermaids and deep blue sea'.

So another head scratcher for me! But I fancied doing something stitchy with book pages and perhaps a bit of digital art as well.

You might recognise the mermaid? Erm...?


There are lots of fabric and paper mixes in this piece all coloured with ZIG Art and Graphic pens from Kuretake using watercolour techniques.


I've used both machine and hand stitching to add some more texture.


The slightly scary, ethereal, underwater mermaid uses digital art techniques and some playing around with image transfer.


It is nice to see that even my alter-ego fish self is nail obsessed!

Enjoy your mysterious underwater Friday.

Kim

Tuesday 2 August 2011

Stamping With ZIG Fabricolor Twin Pens

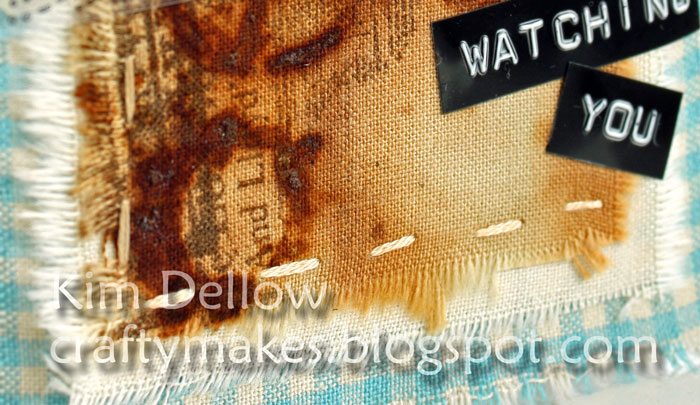
Thought I would play with some fabric for this week's Make The Day Special make. I've been meaning to try out the ZIG Fabricolor Twin pens so I've used them to colour and stamp on some calico to make this little flower ATC.

I've used stamps from the Unity Adventures in Happiness Store kit


If you are interested here is a quick step by step for this project, so time to grab that coffee!

You Will Need:
Stamps: Unity Adventures in Happiness Store kit
Colouring: ZIG Fabricolor Twin pens
Substrate: Card (thin); Calico
Usual Suspects: Bondaweb; Scissors
Equipment: Heat Tool; Iron; Sewing Machine
Other: Craft mat (or stick free surface); Threads; Baking paper; Spray bottle of water; ZIG Water Colour System BrusH20


Prepare The ATC
Cut the thin card to ATC size (2.5 by 3.5 inches) and iron on some Bondaweb to fit the ATC. Don't forget to use your baking paper to protect your iron from the Bondweb!

Rip the Calico to fit the front of the ATC and iron into the Bondweb side of the card.


Colour The ATC
I used the 'Scribble' Technique to colour the ATC, so scribble the brush end of the ZIG Fabricolor Twin pen onto your stick free surface and spritz with water then use the fabric side of the ATC to pick up the droplets of colour. Dry with a heat tool if you are as impatient as me! Repeat this until you achieve a look you are happy with.


Stamp The Image
Again using the brush end of the ZIG Fabricolor Twin pen to colour the Unity Adventures in Happiness Store kit stamp and spray with a fine mist of water before stamping. I wanted the sentiment to be merged into the background so I stamped on a spare piece of paper first before my ATC.

The beauty of the pens is that you can put different colours precisely where you want them on the stamp and I stamped the flowers using different colours.


Add Defining Touches
I then used the bullet tip end of the ZIG Fabricolor Twin pen to define some of the areas of the image and added shading by 'pulling' the colour across with a ZIG Water Colour System BrusH20.

When I was happy with the look a gave it a final pass over with the iron (again using the baking sheet to protect the iron) to dry and fix the colour.


Add Some Stitching
I got my baby out (aka Sewing Machine) to add some machine stitching and 'Voila' one fabric ATC coloured and stamped.


There is just something about the texture of colour on calico that I just love!

Happy Creating!
Kim

ps. scroll down for some lovely Blog Candy give away news


Pin It

Saturday 19 February 2011

Retro Abstract Birthday

What card do you make for a man who is turning 40? Mmm... well if you are me you go retro abstract and what better way to go retro than with the fabulous Basic Grey Offbeat paper available over at Quixotic Paperie. 

Matched with Kraft paper - you guys know how much I love my Kraft and corrugated card LOL! Don't forget that Elaine now stocks Bazzill Kraft card.


I also did some hand-stitching which is made super easy with the Sew Easy Tool. You can even use the tool on circles. 

I used a circle Spellbinder nestibitlies as my template and drew my stitch line on the back of the paper. 


Then I lined up the piercing spike on the straight stitch head of the Sew Easy tool with the drawn line.


Using the markings on the head keeping it in line with the drawn line allows you to pierce holes in a circle. 


Just keep an eye on the last couple of holes if your circle isn't the perfect size you might have to make your own last hole to get the spacing right!


Elaine has been adding lots of lovely new things to Quixotic Paperie, the gorgeous Baker's Twine in all sorts of lovely colours are now in the store - I love these! Have you seen the wonderful new 50's themed Kraftin' Kimmies stamps? Well worth taking a look! Also there are some yummy new papers from Memory box - pretty.

Have a lovely Saturday.
Kim


Pin It