

You need:
Your stamp
Something to stamp on
Range of inks
Little spray bottle filled with water.
I've used three inks in the pink/purple range using the Opera Pink as my lightest colour and Grape as my darkest colour, with Amethyst in the middle.
This technique works with all sorts of different colour matches so play around with the inks you have to find your favourites.

Step One
Decide which side of the stamp will be the lightest and which the darkest. Then start to ink your stamp with your lightest colour on the 'light' side of the stamp. I use gentle tapping of the ink pad on the stamp, better to put on too little rather than too much ink, you can always reapply as needed.
I pretty much cover the 'light' side and the middle of my stamp with the Opera Pink, making sure I get good pink coverage on the 'light' side.
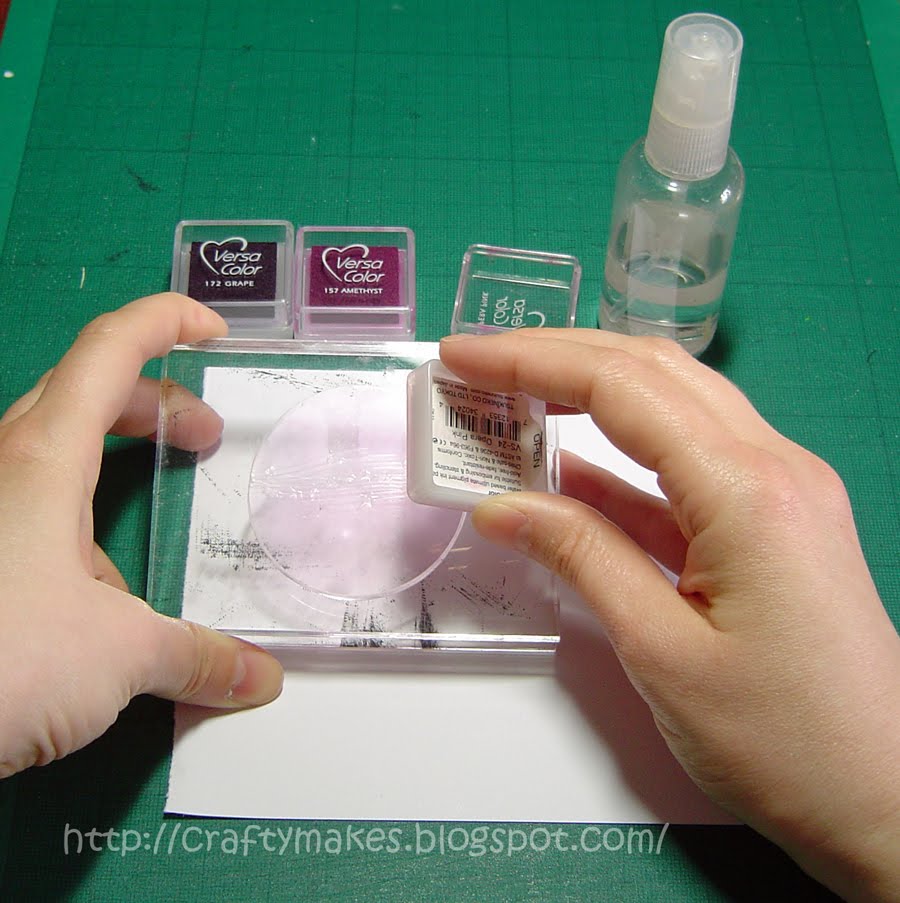
I then use my middle colour, Amethyst, on the middle of the stamp, being careful not to leave any straight lines caused by the ink pad edge. If you need to diffuse any lines or marks then you can always reapply a little of the lighter colour to blend it in.
Step Two
Apply your darkest colour, Grape, to the 'dark' side of the stamp, again if you need to diffuse or blend the colour you can always add a bit more of the middle colour. I then very lightly go all around the edge of this stamp with the Grape colour to get the edge differentiation, you don't have to, I just like it on this stamp.

Step Three
This is the crucial bit! Lightly spray your stamp, this requires a bit of trial and error to know what is the right amount of water for the effect you want, so don't worry if you have to repeat the whole process - it is all part of the fun!
For me I like to have the bottle at least 8 cm (~3 inch) away from the stamp and I hold the both the stamp and the spray bottle upright so the spray is nice and fine and you are less likely to get any spitting or drops on the stamp. For this lightly water coloured effect I only gave it one spray, but it all depends on your spray bottle!

Step Four
Stamp out your image!


This is a wonderful technique to play with on all sorts of different stamps. It works beautifully on your 'block' stamps like this one, where a lot of colour is needed but it also works well on your 'line' stamps where there is more details. Get one of your flower image stamps out and have a go!
Enjoy playing!
Kim

Pin It
Wow!! This is so smart!! I am so going to try this out!
ReplyDeleteHugs Ida:o)
brilliant kim... thanks 4 sharing this with us all..... what a fab idea... and what a brill card... i just love everythink about it...!!!!
ReplyDeletekaz_za
wow thanks kim for sharing your fab tutorial.am def going to try this on a flower stamp.luv coops.xx
ReplyDeleteHi Kim! I love your card, such an imaginative use of the stamp, I would never have thought of that and your tutorial is wonderful, it creates such a great effect. Hope you're well and having a good weekend. Hugs, Chris x
ReplyDeletegorgeous colors! love your beautiful shaped card!! thanks for the tutorial, too!
ReplyDeleteOh that looks awesome Kim!
ReplyDeleteHi Kim,
ReplyDeleteThanks for this tutorial. Another technique to have a play with.
Hugs,
Fiona x
Thanks for sharing, I'll have a go.
ReplyDeletethanks for sharing this clear tutorial Kim!
ReplyDeletexxx Margreet
absolutely gorgeous - sorry i have not been to your blog this week, i have been really busy
ReplyDeleteBrilliant tut Kim... love the effect...thanks for sharing.
ReplyDeleteI just adore the card you made it's so much fun and really clever too :D
hugs
Chris xx
Kim this card is amazing and thank you for taking the time to share your technique! Beth
ReplyDeleteOh wow! Thank you for this tutorial Kim...This is just magnificent...I love how the colors blended so perfectly! You have taught me that it is okay to buy these little things of ink...For some reason I always buy the big stamp pads...not any more!!!
ReplyDeleteBrilliant help, many thanks :)
ReplyDeleteI love tutorials and that circle is fantastic, thanks for sharing x
ReplyDelete