Showing posts with label ZIG. Show all posts

Saturday, 29 December 2012

Konnichiwa For Kuretake

How about a little Japanese inspired make using the ZIG Memory System Scroll and Brush pens?


If you want to see some more details for this one then pop on over the Kuretake blog to see some more. I've done a bit of blending as well as both Italics and Brush calligraphy for this one. 

Have a fun Saturday!
Kim


Tuesday, 14 August 2012

How To Use ZIG Emboss Pens With Masks

Hey up all, got another tutorial for you today. It is always the way, no tutorials for ages then three come along at once (or is that buses?).

This one was on the Kuretake Blog and is for the card I made for the Wedding-inspired challenge.

Now you still have time to join the Wedding challenge and there is £50 bundle of Kuretake and Basically Bare products up for grabs, there aren't many entries, in fact none at the moment, so your chances of winning if you link up is very high indeed! LOL! But get your skates on - there are only 3 days left to enter.

Ok, onto the tutorial - it uses the ZIG Emboss pens and masks.


You Will Need:
Embossing Powder
Spray bottle - water
Plastic Palette
Mask (TCW Damask)
White Card
Anti-static Bag
Heat tool

First you will want to add some colour to the card using the ZIG Art and Graphic Twin Pens and the  ZIG Watercolour System BrusH2O


I like to scribble the ZIG Art and Graphic Twin Pens onto a piece of plastic such as a palette or some old packaging or even a spare acrylic block, then I pick up the colour with the ZIG Watercolour System BrusH2O and swish it across the card. To get more of a spread I might also spritz the card with water. 

Let the card dry completely before moving onto the next step.


Wipe the card with the anti-static bag then line up the mask where you want the embossed image to be.


Hold the mask in place (you can stick it down with masking tape if that helps) and use the ZIG Emboss Pen brush nib to 'block out' the design through the mask.


Sprinkle on the embossing powder, tap off the excess and heat. I added the embossing powder in stages by embossing part of the pattern, heat fixing it then re-aligning the mask and adding the next part of the pattern. If you need to, you can also fill any 'missed' bits by going over the pattern with the pen again and adding more powder.

Next emboss the sentiment.


You can use the ZIG Emboss Pen directly on the sentiment stamp, again I've used the brush nib. Stamp the sentiment out and add the embossing powder, tap off the excess and heat.


Enjoy all the Wedding inspiration on the blog and don't forget to link up your makes on the Challenge post.

Thanks for popping by.
Kim


Wednesday, 8 August 2012

New Papercraft Essentials Time

Hey Crafty Chaps, I've got a little heads-up for you with an article in the new issue of Papercraft Essentials issue 84.

It's only a small one from me this month with two cards but a great one for the kids if you are looking for cards to make on a rainy day with dried pasta.


I've also used some PanPastel and the ZIG Painty pens for this one.

Kim


Thursday, 2 August 2012

Mixed Media Tag With ZIG Cartoonist Inks

I have some inky tips to share with you today, this post has been on the Kuretake Blog recently but I wanted to share it here as well.

But before I do don't forget to check out the new Kuretake Challenge - there is £50 of Kuretake and Basically Bare products up for grabs.

Back to my tutorial today, I've been playing with lots of inky bits and bobs recently and one of the new ranges I've been able to try out is the ZIG Cartoonist range from Kuretake which have been designed specifically with Manga and Cartoon artists in mind. But they have lots of other applications too and I wanted to show you how they can be applied to a mixed media project, so I've used the ZIG Cartoonist Sumi Ink and the ZIG Cartoonist White Ink for this Butterfly Tag.


As you can see I've also done a little bit of recycling too with old book pages and packaging.


I've covered the tag background with a coat of Gesso then used the ZIG Cartoonist Sumi Ink and nib to add the border. But that is all I've done to the background. The focal point on this tag is an ink blot butterfly and I wanted to share with you how I made it.


You Will Need:
ZIG Cartoonist Sumi Ink 
 ZIG Cartoonist White Ink 
ZIG Nibs and Nib Holder
ZIG Cartoonist Brushes
(Pipette - optional)
Old book page
Spare paper
White Card
Tag

To start you might want to practise making your ink blot Butterflies on spare paper before committing your old book page.


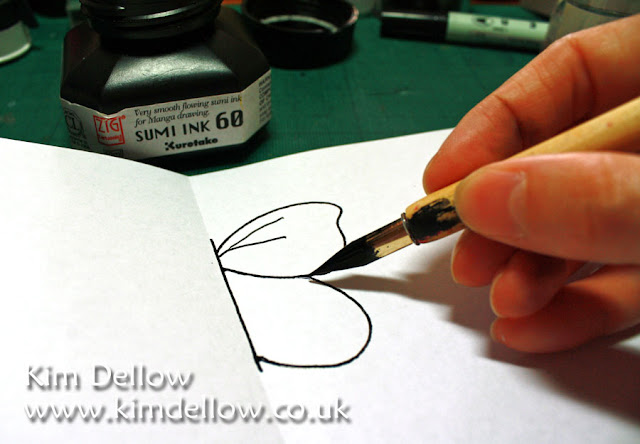
Fold the spare paper in half and use the dip pen and nib to draw a line with the ZIG Cartoonist Sumi Ink to act as a guide to drawing out the rest of the butterfly. You want to work relatively quickly so that the ink remains wet and a bit of trial and error will give you an idea of how much ink you need to get the kind of blot pattern you want. You can also experiment with the pipette to draw the butterfly too if you want a bolder ink blot.


Fold the paper at the pre-made fold and use your fingers to smooth and spread the ink out. Open the paper again to reveal your ink blot butterfly.


Now you can do the same on the old book page, just remember that each ink blot butterfly is unique!

I have another tip to share today and that is the making of the sentiment.


Spread the ZIG Cartoonist Sumi Ink with the back of the nib onto some white card and let it dry.


Write out the sentiment in the ink using a brush. Once the sentiment is dry tear the sentiment out letting the white card show and it is ready to stick to the tag.


Hope you enjoyed that bit of inkyness and will have fun with your ink blots. If you want to see another butterfly ink blot checkout my grungy boy card from May.

If you happen to be near the Greenford Hobbycraft I shall be there on Saturday 4th August 10am-4pm Demoing for Kuretake - see you there!

Have fun.

Kim


Sunday, 29 July 2012

Time For...

A couple of shout outs!

It is article time again but only a tiny one, I have a couple of cards in this month's Simply Cards and Papercrafts and get this, it is Simply Cards and Papercrafts 100th issue!


Happy Birthday Simply Cards and Papercrafts! (The '100' card in the circle is one of mine).

The second shout out is yet another bit of shameless self-promotion, I've got an interview on the Fiskarettes website if you are interested.


I've also got a project and tutorial on the Kuretake blog using ink and nib work on a mixed media project, which I will be posting here at some point, but if you can not wait for it to get here then pop on over to the Kuretake blog to see what I've made.


Zoom and I'm gone again, a very quick post from me, giving you plenty of time to do some more blog hopping, well time to check out my interview of course! (I am actually blushing with embarrassment as I write this!)

Have fun.

Kim


Friday, 27 July 2012

A New Project - Scrapbooking Me

Project number 6 trillion and 22 - Scrapbooking Me.

So I've started a new project, this one is a retrospective. I'm hunting out old pictures of myself to scrapbook, journal or memory file, kind of watching how I've changed over the years. So here is my first make in the project, an 8"x8" scrapbook page with a picture from way back in 2007.


Oh so much younger, a full 5 years ago! Ok so probably not that much younger, luckily it wasn't taken with a hi def camera! The photo was taken in March with a mobile phone camera coming back from a lovely day trip to Winchester. I've done some Photoshop jiggery pokery to the photo and added a vintage frame.


And one of my Washi Tape suns, the ZIG Photo signature pens are totally perfect for writing on the slightly non-absorbent Washi Tape by the way. Have I mentioned how much I love these pens? They are definitely in my top five, they are so useful. Anyway I digress The Zig Zag pattern is a Hero Arts stamp. 


I've used Heidi Swapp No Limit papers 'coz they perfectly matched the photo and their style kind of matches me as well. I love the blue prints and technical drawings - very me. The number stickers are the Heidi Swapp Color Magic Letterbox Resist Alphabet Stickers and I've treated them to an acrylic paint make-over. 

So have you started any new projects recently? I would love to see them! Feel free to do a Scrapbooking Me project just remember to drop back and leave me a link to your project if you do.

Enjoy your Olympic Friday!

Kim


Monday, 16 July 2012

Travel Sketching Saturday

What? No La-La Land Crafts Monday Inspiration post today? No, but if you drop by tomorrow I'm sure you will see some La-La Land Crafts! Well actually I know you will! The CHA in the USA starts tomorrow and I've been busy making samples.  So my samples are there even if I'm not!

But you haven't dropped by my blog for nothing, I have a personal project to share with you today some more of my sketching. I shared one of my little sketches that I had made into a card not so long ago. So here is another, this time a travel sketch from my smash / notebook.


We went up to visit my parents this weekend and the train trip meant I had some time to do some sketching practice. I always try to travel with something to sketch with, so me and my ZIG Memory System Writer pen are inseparable and for colour I took along some Derwent Graphitint pencils and my ZIG Water BrusH2O - another must have in my pencil case. 

We had a lovely trip and it was great to spend some time with my parents. Hope you had a lovely weekend and got some artiness fitted in too!

So now you are refreshed after the weekend and ready for a creative week?

Catch you later.
Kim


Tuesday, 20 March 2012

Review - ZIG Cocoiro Lettering Pen From Kuretake

Buffy from Kuretake recently sent me one of the ZIG Cocoiro Lettering Pens from their Japanese Stationery range to try out - so it is review time!


So the first thing to notice about the ZIG Cocoiro Lettering Pen is that you can choose the colour of the body and the colour of the ink. You can even choose the type of tip for the black ink. 

It is kind of like a mix 'n' match selection for your pens. Currently you can choose from ten colours of the Cocoiro pen bodies and six ink colours for the Extra Fine Refill and a black Refill Ball Tip as well at the Kuretake Shop.


I had the Sky Blue body with the Dark Green (colour not currently available from the Kuretake online shop) Extra Fine Refill to try out, each arrived in their own little plastic sleeve. Once unwrapped you can remove the temporary cap from the refill, save it for later as it will be useful if you have lots of refills to swap around with, remove the cap from the body and slip the refill in. The refill screws into the body to keep it in place, then you can replace the lid that came with the body.


The end of the refill pokes out of the end of the pen so that you can see what ink you have in the body and the whole pen is extremely light to carry. It is very quick and simple to put together and you can easily swap in a different refill in no time at all. But to be honest I would probably have a couple of different coloured bodies too 'coz I like the colours and I am a bit of a pen fiend!


The Extra Fine Refill tip is a stiff brush and you can get a variety of ultra thin and wider marks so when you use it for writing you get a flow of thick and thin lines. Same with drawing too, the flow of the tip across the page means that the line thickness will change as you move the pen. It takes a little getting used to but with some practice you can use this to your advantage, say for making the trail of the mark thin out at the end for example.


There is a little dryness to the ink flow that I'm not used to with Kuretake products so that also took a little getting used to. But I found that if I used the pen more slowly and made the marks with more purpose (i.e. didn't scribble at high speed) then it wasn't a problem. The ink is not waterproof so don't use it on your unfinished art journal pages or anywhere that might come in contact with liquid.


This is a great pen for doodling and writing in your notebooks or Smash books. The 'interactiveness' of changing the refills really appeals to me as it means I can change the ink colour to match my mood - and yes I do frequently change pen colours to match my mood! No really - I do! 

If I was doing some full on drawing I might grab one of my other Kuretake ZIG pens first but I would quite happily sit there doodling into my notebooks with a ZIG Cocoiro pen - just stay away from me if you spot me using black or red LOL!

Enjoy perusing the yummy colours!

Kim

(Disclaimer time- you guys know I'm on the Kuretake Design Team, I don't get paid for my reviews or opinions but I do get product. I still try to give you my honest, unbiased opinions to the products I test whether I'm on the design team or not.)


Wednesday, 18 January 2012

What's On Your Workdesk Wednesday - WOYWW

What is this? I've managed to join the WOYWW revellers on two consecutive weeks? Shock!

Yay! Hello WOYWW-ers!

I thought I would show another mini-journal page this week on my rather untidy work space. I've been playing working with PanPastel and Zig Millennium pen.


With a little bit of old map page altering, well tiny really - the ickle house on the hill. It is only a little bit of cutesy journalling fun :)

If you want to join in the WOYWW fun then don't forget to pop on over to Julia's blog Stamping Ground!

Catch you later Jounallaters!

Kim

Wednesday, 11 January 2012

What's On Your Workdesk Wednesday - WOYWW

Mid-week check up!

How are you all doing? What have you all been up to since Monday? It's commission land here, been a bit obsessed trying to finish something off but I did spend a little time playing with some acrylic inks and my ZIG Writer pen


I meant to show it to you last week for a bit of colourful fun but I've just been totally focussed on this commission.

 I thought I would link it up to the lovely Julia's What's On Your Workdesk Wednesday (WOYWW) 136. My first of the year!

Better get back to work...

Catch you later.
Kim

Tuesday, 20 December 2011

A Tag And A Couple Of Fond Farewells

Hey All, I have a tag for you today using the lovely Paper Smooches Promenade stamp kit available over at the Make The Day Special shop.


I've used the ZIG Art and Graphic Twin pens for this make and you might recognise the shape! I did say that it was one of my favourite tag shapes at the moment. You can download a free template for it with my project over at the Make With Me website if you would like to use the same shape.

*****

Well, as this post hinted to in the title I am saying a fond farewell to a couple of my design teams. It has been a tough decision as I've been with both teams practically from their start up and I have enjoyed every minute of it. But it is time to work on some new projects and so I've stepped down from the Make The Special and Quixotic Paperie design teams.

I will miss working with Emily from Make The Day Special and Elaine from Quixotic Paperie they have both been wonderful bosses :) I will also miss all the girls on both of the two fabulous teams, you guys have been the best!

You will still see makes on my blog from both shops of course but for all the latest news don't forget to check out the Make The Day Special and Quixotic Paperie blogs.

Kim