Showing posts with label review. Show all posts

Friday 29 November 2013

Buttonbag Christmas Advent Calendar Kit Review

Review time! Are you looking for a DIY Advent calendar but you are a complete crafty beginner? Then this might be right up your street. It's the Christmas Advent Calendar craft kit from Buttonbag available from John Lewis


Now this kit involves a bit of stitchery but you don't need a sewing machine and you get all the fabric, threads and needles you need to complete it. You get a 48 x 80 cm printed cotton panel that acts as the backdrop that you then stitch the 24 different coloured felt squares to make the little pockets to fill with toys or sweeties or whatever you want. The toys and sweeties aren't included though! 

You get a rainbow of embroidery thread that you can use to decorate and stitch on the pockets with. There are also some ordinary threads in three colours plus black and white, some pins and a single snap fastener, I'm not really sure why that is in there...answers on a postcard...erm?


Also in the box are four large rectangles of sticky-back felt to make the decorations with. There are some shapes, numbers and an alphabet printed in the accompanying leaflet that you can use as templates. The leaflet also has the instructions and a rundown of Buttonbag's other craft kits you can buy. Finally in the box you will also find a little strip of twill tape, which you can make hooks to help hang the calender with.


The box is nicely presented and the contents are good quality. You get a lovely range of colours with the pockets and the embroidery thread, which is nice and there are a few options of the sticky-back felt too.

The back cloth has some lovely snowflakes and stars printed on it, but I have no idea why as you cover them all up with the pockets you stitch on, which is a real shame. But I suppose that does mean that you don't have to use it as an advent calender if you didn't want to, you could use it for a countdown or some other fun pocket-filling use. Perhaps as a bribe incentive mechanism for getting chores done?

I suspect, although I haven't tried it, that it might prove a little hard to hang up and you may need to add three hooks to the calendar rather than the two suggested in the instructions. You may also need to get some hooks that attach to your door or wall to hang it up on and you might also want to just fill it with things that are light. I would also be wary of stitching into the gummed felt as it might leave the needles tacky and impossible to use on the rest of the make, cutting it might be a pain too.


The kit is extremely simple: all you really need is some common sense and to know how to thread a needle and how to stitch a basic stitch to complete it. If you don't know anything about stitching, there are no instructions on how to sew, but then that is what the internet is for. 

If you are an experienced stitcher then you will find this kit too basic for you and you probably have all the threads and felt you need stuffed away in a draw some where don't you? You could always use things that aren't in the box to decorate your advent calendar and practise some of your embroidery stitches to add some interest. 

This would be a good kit for beginners so it would be good for crafty children or for a totally non-stitchy or non-crafty adult who wants to make a handmade advent calendar and doesn't have a collection of fabric scraps and threads lying about. 


The Buttonbag Christmas Advent Calendar retails at £16 and you can check it out, plus other Advent Calendars, over on the John Lewis website.


I would love to know if you have an advent calendar this year, did you make it yourself? Or do you have this or any of the other Buttonbag kits? I would love to hear about them.

Catch you later.

Kim


[Disclaimer Time: This is a sponsored review but as with all my reviews I always try to give you my honest, unbiased opinion. (Prices correct for the date the blog post went live)]

Wednesday 31 July 2013

Crafty Magazine Review

I LOVE magazines. You guys know I do! As well as being lucky enough to be in them and to work with the editors, I also love the inspiration they provide and the amazing work people do for them. There is nothing I enjoy more than sitting back with a cuppa and flicking through a magazine, it is one of my 'treats'. I don't know about you but I get a real kick from getting a new magazine and unfolding the ideas page by page.

So I'm loving the variety of magazines that have been hitting the shelves in the last couple of years; every time I go to my local newsagent there seems to be a new magazine. Recently there seems to be a strong trend towards the Blogger Lifestyle magazines, Crafter/Maker Lifestyle magazines and Upcycle magazines.


Crafty Magazine is the newest addition to the Practical Publishing Craft magazine offerings and is definitely in the Craft Lifestyle camp, but it also feeds off the Blogger Lifestyle and Upcycle trends too, a great combo for many of us multi-crafter types.

Crafty Magazine was launched in spring this year and has a variety of interviews, projects, news, columnists and inspiration. The editor, Sarah Adie, is a crafty blogger and journalist and you can find an interesting Day In The Life Of Sarah Adie over on Tilly and The Buttons Blog.


The magazine is nicely set out with inspiring photography. It is a magazine you can flick through for eye candy but it is a fun read too, with interesting snippets into crafter-makers' lives and some fun projects. I particularly like the articles with the latest news on the new craft movement, and the magazine has a two-page spread on what is trending at the moment plus regular columns from Sarah Corbett, founder of the Craftivist Collection, and Mr X Stitch (Jamie Chalmers) keeping it fresh.

I loved the insight into knitwear designer Alexandra Järup's living space on a narrow boat in issue 2 and I'm definitely going to be looking out for the Tweed Run (issue 3) next year in London. I only got my hands on issues 2 and 3 to review but our very own Stéphanie de Geus, editor of Simply Cards and Papercraft and Get Stamping, has an article on vintage cameras in issue 1, which I'm so going to grab a back copy of.


Crafty Magazine is around 100 pages, A4 size and the matt cover and glued binding makes it feel like a substantial offering and it competes well with other magazines aimed towards the Blogger Lifestyle and Crafter/Maker market. For me Crafty Magazine has more bite than others and I actually want to read the articles. It comes with a cover gift and ideas for its use and retails for £4.99 (in the UK).

If you want to connect, they have a website, Facebook page, Pinterest boards and Twitter stream. You might also want to check out the Google+ community too.

Would love to hear what you think about Crafty Magazine if you have had a chance to see it.

Happy crafty reading.

Kim


[Disclaimer Time: I was not paid to write this review, however, I did get two free issues and well you guys know I do a lot of work for Practical Publishing. But as with all my reviews I always try to give you my honest, unbiased opinion. (Prices correct for the date the blog post went live)]

Monday 8 July 2013

Totally Cracked! - Kroma Crackle Medium Review

Ok so I am a bit of crackle monster - Oh yeah! I just love the crackle! Crackle effects that is! I'm always on the hunt for the perfect crackle effect, so when the Kroma Crackle Medium first hit the blogosphere I was super keen to give it a go.


You will find everything you need to know about Kroma Crackle over on their website, including a guide and some videos on how to use it

It comes as a semi-transparent gel medium and you can use it as it is and it dries to a white colour:


Or mix it with up to 5% acrylic paint to colour it:


The way to apply it is to use a palette knife to spread it over a surface, keeping the medium at least 1 mm thick if not thicker. The smaller crackles you can see in the pictures above are where it was around 1 mm thick or less.

The Kroma Crackle needs time to cure, you will start to see crackles within 24 h but give it a couple of days to fully dry, particularly if you used a thick layer. Once the Kroma Crackle is dry, seal it with a layer of a clear acrylic medium before you do anything else to it (I used Golden Polymer Medium).

I tried it directly on paper but found that once the medium dried the crackles would flake off too easily. It works really well if you prime the surface with acrylic mediums or paints first to give it something to 'stick' to. But you will still need to seal it once it is dry, just to make sure the crackles stay put before you do anything more to them.


Once you have your sealed crackle surface, you can then add more colour to it and work on it some more, just think what you can do with all that texture! There are some fab examples on the Kroma website and also have a look at what Michael deMeng does with it. 


As I said at the start I love crackle and I've tried lots of different products to reproduce it, some one-step, some two-step, pastes, glues etc and of course the PVA trick is one of my go-to techniques. But I think that Kroma Crackle is going to be my most used crackle product - I LOVE it! It is easy to use, but I would say give yourself a bit of play time with it to see what you can do and to get used to it. One of the things I love about it most is that it works on 'softer' surfaces such as paper and you don't have to use it on stiff board to get a good crackle. 

I wanted to have a lot more samples to show you but I've just been so busy with commissions that I haven't had a chance, so keep your eyes out for projects using Kroma Crackle here in the future!


Kroma Crackle is available in 150ml tubes which retail around £8.99 here in the UK and you can find it over  at Indigoblu.


I would love to know what you think about it if you have used it already.

Catch you later Crackle Monsters!
Kim


[Disclaimer Time: I was not paid to write this review however I did get a tube of Kroma Crackle to try out. But as with all my reviews I always try to give you my honest, unbiased opinion. (Prices correct for the date the blog post went live)]


Thursday 27 June 2013

Online Tutorials At The Amazings And Get Your First Class Free!

Looking for some classes? Have you tried The Amazings yet?

[Photo credit The Amazings]

Cute name! The Amazings is a platform for marketing classes and workshops on a whole range of subjects including arts and crafts. But to stand out from the crowd all The Amazings teachers are over 50 years old. Most of the classes the teachers run are offline, i.e. they run in real life (I know - there is a real world honest!) and most of them in London but The Amazings are now launching their online classes.

So The Amazings asked if I would like to have a look at a couple of their online classes and tell you guys about them and in return you guys can get your first class free - but more about that later! 

I got to check out two classes, the 'Upcycle a Man’s Shirt into a Summer Dress' by Judith Paris from Thrifty Couture and 'How to Make an Altered Book' by Jacqueline (no link as I could not find any other contact or even her surname - sorry Jacqueline).

[Photo credit The Amazings]

Well first off the production standard of the classes were Amazing! The whole website is beautifully designed and that production level can be seen in their online classes too.

The style was very relaxed and in both the classes I watched there was the teacher taking someone through the steps. The two-person-style online classes can lead to some interesting banter and exchange of ideas. But it can also make the class a little long if you are looking for a quick answer, but they are selling an experience more than a quick answer.

The classes are split into segments showing different stages in the project and each segment can be anything from a couple of minutes to just under 15min long. There are also tips left by the teacher in the online 'classroom' area and a place to ask questions to fellow students or the teacher.

[Photo credit The Amazings]

With my student hat on, both the teachers I watched came across really well and as I said the production level is top notch. I like the idea and probably like yourselves have watched many paid-for and free online workshops and classes over the last few years, but for me to part with cash the class does need to offer me something I can't get elsewhere whether that is content, connection with a teacher I admire, connection with fellow students in a virtual classroom or downloadable and extra content. For me The Amazings online offering isn't quite there yet, but I will be keeping my eye on them.

I'm guessing (but might be wrong) that The Amazings is planning to build an online community where you can upload your makes, as more people join, which would be great. Be aware that they have a clause in their sign-up that states that anything you post as a student can be used by them, so may end up in their marketing materials (this is not an unusual clause for most things you do online unfortunately).

I have a feeling that the classes are aimed at teens/twenties/early thirties with the whole 'wisdom from elders with amazing life experience' philosophy of The Amazings. So probably geared more towards complete beginners, well at least the ones I watched were, and would be great for someone starting out in the crafty/arty arena. Maybe as they grow there will be a range of classes directed to different levels of experience - that would be good.

[Photo credit The Amazings]

Putting my teacher's hat on for a second (as I know a few of you make your own workshops and tutorials), the teachers get 30% royalties from the online classes (more for the offline classses they run and The Amazings market). I don't have any numbers for their reach but they are doing a big marketing drive at the moment and, if that keeps up, then it may be a good platform for anyone who doesn't fancy doing all the marketing and video production themselves - neither of which are particularly easy I can tell you! So if you are over 50 and looking for a way of reaching people then have a look at their Teacher FAQ so that you can compare it to other online classes and workshop platforms. This Teacher FAQ is directed more towards the offline classes at the moment but worth keeping an eye on as their online classes grow.

So back with my student hat on! If you fancy trying out the classes for yourself, the online classes start at £8 and are around 1-2h long and here are their current classes on offer:

Make Natural Beauty Products
Three Retro Hair Dos
Make a Mosaic Flower Pot
Learn to Patchwork Quilt
Try Altered Books
Turn a man’s shirt into a summer dress
Create a Silver Metal Clay Butterfly
Loom knit a woolly hat

You can try your first class for free if you follow this link here and sign up. I would love to know what you think!

Enjoy
Kim


[Disclaimer Time: I was not paid to write this review however I did get access to two classes and a link for my readers to get a free class. But as with all my reviews I always try to give you my honest, unbiased opinion. (Prices correct for the date the blog post went live).
ps. all the photos in this post are courtesy of The Amazings.]

Friday 21 June 2013

Cricut Mini - Personal Electronic Cutter Review And Giveaway

[UPDATE: GIVEAWAY IS NOW CLOSED]


Hey All, I have another in my series on electronic cutters for you. I've been recently introduced to the world of electronic cutters and I am having fun trying out and comparing different personal cutting machines; you can find my review and first tutorial on the Silhouette Cameo via this link.

Today my focus is on the Cricut Mini and have I got a treat for you!

Oo yes I'm very excited but read on and you will find out what the treat is (well if you haven't guessed from the blog post title already!).

[There are some affiliate links in this blog post, so if you buy through them I do get a small amount of money at no extra cost to yourself. Thanks for your support!]


So as the name suggests, this is one of the smallest personal cutting machines on the market and from the Provo Craft electronic cutting machine range. It is approx. 41cm long, 18.5cm wide and 9.4cm high (16.1" x 7.3" x 3.69") and weighs in at 2.38kg (5.25lbs).

According to the Cricut information, it can cut lots of different materials such as cardstock, vinyl, vellum, fabric, chipboard (probably thin chipboard, I would guess). So far I've only used it with cardstock and patterned paper but I will report in when I've cut a different material! The cutting range is 0.635cm to 29.21cm (¼" to 11 ½") and the cutting mat is 21.59cm x 30.48cm (8.5" x 12").

OK, so that is the technical specifications, what about getting it out of the box? Well, of the three electronic cutters I've had the pleasure of trying so far, this was the simplest to set up and the quickest from out of the box to first cut.

Like all Cricut machines it works from cartridges, but luckily for me, who doesn't have any cartridges, it also works with the Cricut Craft Room which is a free online software from Cricut.


You can access this software via the internet and you need to download the free application and install it on your computer. The software gives you access to some free images as well as the 'Cut It Free For A Week' images. But the rest of the images you will have to buy.

The thing to remember when using the software though is that you can see all these lovely images whilst you are designing but if you haven't bought them you won't be able to cut them! So go buy them or just remember to look through the 'My Cartridges' drop down menu when you are working on your projects!

If you do have cartridges you can still plug them into the Cricut Mini, but you can buy access to cartridges online as well rather than have the physical cartridge. The Cricut Image Library also has single images for sale so you don't have to buy full cartridges if there are only one or two images you need in that cartridge. 


The software is very simple, perhaps a little too simple for my liking. I did feel a bit restricted by what I couldn't do with it, for instance I don't think there is an align function. Well I searched for one and even looked online for help and couldn't find one (feel free to tell me if I'm being an idiot and just missed it somewhere!).

At the moment, you can't cut your own images or non-Cricut images, which is a shame, but if you are looking just to cut the images you have on Cricut cartridges or via the Cricut Craft Room, then the software works and you can do things like design on different layers then cut all the layers or just one of the layers. Which is great as you can have all the images ready to cut on different papers and just cut the one you want for the paper currently on your cutting mat.

When you log in to the software you are logging in online and any projects you save are saved into your account. I don't think you can use the software offline, so if your internet goes down in the middle of a project you may be a little put out!


I did have a little bit of problem with my cuts as the machine was putting little nicks where they shouldn't be, so I tried to slow the cutting speed, which helped. The customer service was very good and they kindly sent me a replacement blade and blade housing, which has improved the cuts, but I am still getting nicks where I don't want them.

But you can barely notice as you can see from this make using the Cricut Preserves images.


You can find the Cricut Mini retailing for upwards of £114.99 depending on where you buy and what comes with it.  Also keep your eyes on Creative Expressions as they are now one of the UK distributors of Provo Craft Cricut products.

My thoughts on the Cricut mini so far are that for quick and simple cutting, this machine works well. Its mini size and weight are great for the space conscious and its mini price makes for a fabulous starter cutter for the price conscious. I'm really enjoying playing with this machine and am looking forward to making more cuts. 

*****

Now for the treat! The lovely people over at CricutEU are offering one of my lucky readers their very own Cricut Mini to cut with to their heart's content!

Yep! A Cricut Mini is up for grabs: just put your name in the inlinkz gadget below. 

Don't forget to go link up with CricutEU on Facebook for all the latest news and information.

Follow if you like what you see here and spread the word about the giveaway!

The giveaway is open until 21st June 2013. The winner will be chosen by random and announced on 22nd June 2013.

Good Luck

[UPDATE: GIVEAWAY IS NOW CLOSED]


[Disclaimer Time: I was not paid to write this review however I did get a machine to review and access to cartridges. But as with all my reviews I always try to give you my honest, unbiased opinion. (Prices correct for the date the blog post went live)]

Thursday 9 May 2013

Creative Expressions Metallic Gilding Wax

It's review time! This week I'm taking a look at the Metallic Gilding Waxes from Creative Expressions.

[Some of the links to products are affiliate links]

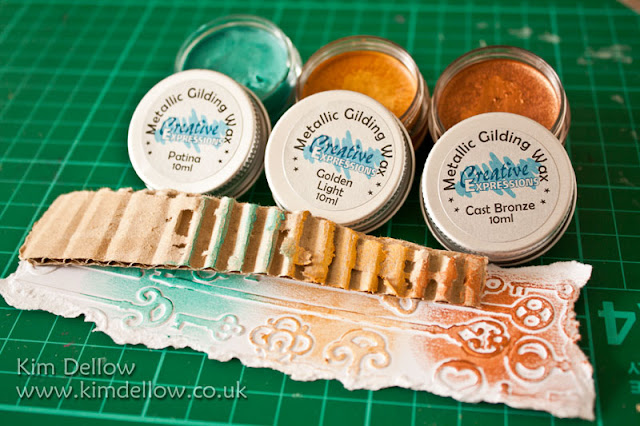
Gilding wax in tubs and on card

Now if you haven't spotted this product yet but like that metallic sparkle on your projects, then this is definitely for you. They are pots of  a coloured wax that you wipe onto the project surface to give a metallic sheen. They are particularly perfect for picking out texture, so look great on dry embossed items but also look wonderful on all sorts of other surfaces too. Gilding waxes are often used by interior designers to shabby chic pieces of furniture to give it that luxurious patina look but us crafters love them too!

The Creative Expressions Metallic Gilding Waxes come in 10 yum colours and I've used the Golden Light, Cast Bronze and Patina for my examples here today.

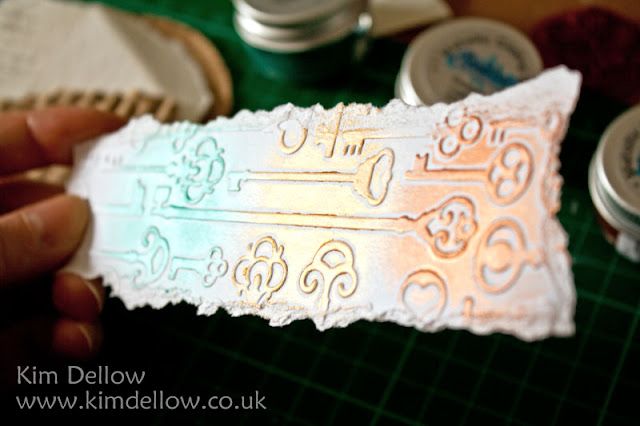
The shine of gilding wax on paper

They really do give a high metallic sheen to a project. The wax is really easy to apply, you just need to take a small amount from the surface of the pot and wipe it across the surface of your project. 

The pot suggests that you apply it with a cloth onto your surface, but I also used my fingers, making sure that I wiped the majority of it off my fingers onto a cloth and then washed my hands thoroughly too. 

Once the wax has dried you can add an extra shine by buffing it with a clean cloth. It is one of those products where a little bit will go a long way and I am sure that the 10 ml pot will last a very long time.

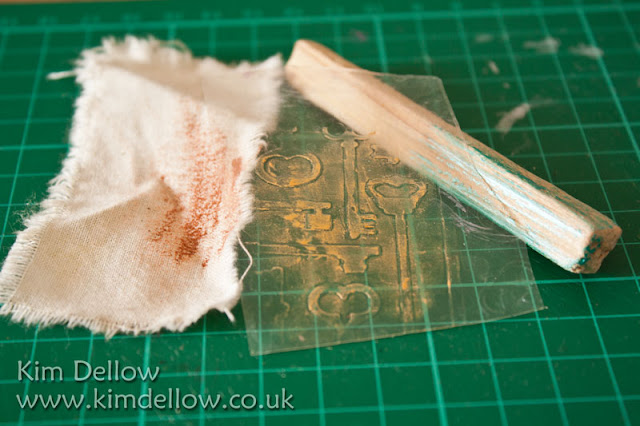
Gilding wax on fabric, acetate and wood

I've tried it on a number of different surfaces and the photo above shows the wax on fabric, acetate and wood (left to right) and you can also apply it to metal and painted surfaces too. 

The wax is very soft and malleable and my tip would be not to take too much of the wax in one go.You do get a little bit of flaking when you try to take a large amount of wax at once, but all you have to do is work the flakes into the project or drop them back into the pot and take a smaller amount of wax.

Close up of embossed paper rubbed with gilding wax

Of course I had to try it on black card too and what a fabulous look that gives, so don't forget to try them on your coloured card!

So the Creative Expressions Metallic Gilding Waxes look just as good covering large areas as they do adding small details and touches to a project. They add a really luxurious twist quickly and easily to your project.

Father's day tag

I've used the Golden Light Creative Expressions Metallic Gilding Wax on the corrugated card, edges and metallic brads in this Father's Day tag.

The sentiment and car are the Vintage Car set from the Creative Expressions Single Stamps range.

close up of the Father's day tag

The flowers are the Heartfelt Mini Vintage Floret Pre Cut Set. I've also used the Creative Expressions Umount Texture Plate and some Cosmic Shimmer Misters.

If you want to see some more fabulous ideas for using your Creative Expressions Metallic Gilding Wax then check out this lovely project from Tracy Evan's blog. But you also NEED to check out Suzanne Saltwell fabulous stamping with the Gilding Wax over on the Creative Expressions Blog.

I would love to hear what you think about these gliding waxes if you have them, or other waxes that you use.

If you are looking for more ways to get that gold look then try these posts:

Get the gold look with Transfer foilsget the gold look with Krylon Leafing PensA gold touch added to a vase with gilding flakes

Thanks for popping in.
Kim

[Disclaimer: At the time of writing this review I was on the Creative Expressions Design Team and I was given this product to use and review but as with all my reviews, I do try to give you my honest unbiased thoughts.]


UPDATE: 2nd June 2014 Hi Guys, I thought I better put an update to this review, it seems that a number of people have been having a problem with this product being far from soft and easy to work with and their pots have been very hard. So much so that a few months after releasing the Gilding Wax Creative Expressions bought out a softening fluid that you could buy to soften hard wax. I've never had this problem with my pots so can't really give much advice and all the advice I have is in the comments below. If you are still having problems then the best bet is to get in touch with Creative Expressions via email at sales@creative-expressions.uk.com or find them on their Facebook page. Hope that helps.


Kim Dellow blog post signature


Come And Connect With Me:

YouTube

Instagram

My Shop

Join My Newsletter!

Facebook

Pinterest

Twitter

Thursday 18 April 2013

Silhouette Cameo - Electronic Cutting Machine Review

It's time for a mini-review, well more of a first thoughts on a product blog post, and the product I've been playing with is the Silhouette Cameo electronic cutting machine.

PLEASE NOTE: This review is for the Silhouette Cameo but the product links go to the up-to-date Silhouette Cameo 3 and the most current software which is now available! I don't have the current model so the review is true for the older model.

If you haven't come across electronic cutting machines before, they work in a similar way to your home printer but instead of printing they are loaded with a knife and cut shapes out. Some machines come with cutting mats and some don't. Also some machines can stand alone to cut and some need to be plugged into your PC or MAC to cut.

[There are some affiliate links in this blog post, so if you buy through them I do get a small amount of money at no extra cost to yourself. Thanks for your support!]


The Silhouette Cameo comes with a 12" by 12" cutting mat and can be plugged into your computer. But it also has a memory card slot and you can cut from the memory card using the LCD screen on the machine itself, I've not tried this yet, it is on my list!

I found the Silhouette Cameo easy to set up, and it come with the basic Silhouette Studio® software on a CDRom, but I also updated it to the newest version for free via the Silhouette America site

Now, I'm the sort of person that just likes to plug things in, press all the buttons and not read the manual and yes it has led to difficulties in the past. This machine wasn't quite plug in and go and I was very well behaved and worked my way through the very easy to follow set-up manual.

The machine itself measures 53.1 cm x 16.5 cm x 12.7 cm (20.9” x 6.5” x 5”) and weighs 2.96 kg, it can apparently cut as small as 1/4” and up to 12” wide and 10 feet long, another thing on my list to try. You can find the full specs in this PDF on the US website

The blade comes in a plastic housing not attached to the machine and you need to set the depth of the cutting blade manually with the supplied plastic ratchet before loading the blade into the machine, but this is all part of the set-up info you get.


As I said, the machine comes with the basic Silhouette Studio® software and if you want even more creative input you can upgrade, for around £30-£45 (UK) to the Silhouette Studio® Designer Edition. If you want a comparison of the features of the two Silhouette software then check out this PDF file.

With the Silhouette software you can access the online cutting files from the Silhouette America online store, you get access to some 51 free files but you will need to buy other files and I believe that most machines come with a $10 voucher to help start you off. You will also find free files each week in the online store, so keep your eye out for them.

The Silhouette Studio® software reminded me of using software like Inkscape (the open source equivalent to Adobe Illustrator). I love playing with creative software and if you do too you will take to it easily. If you aren't used to using this type of software you might find it a steeper learning curve than you would find with some of the competing cutting machine software, but stick with it as the flexibility and creative freedom it allows you is totally worth it!


One of the biggest advantages with the Silhouette machines is that you can design your own cutting files. But if you want to design and import your own SVG cutting files you do need to upgrade to the Silhouette Studio® Designer Edition *so on my wish list*.

You can, however, actually design some of your own cuts even with the basic software and the photo frame, tab and sentiment on the card below were made to my own simple design using the basic Silhouette Studio® software and cutting some Studio Calico paper from the Heyday collection. 


Hey not bad for a first cut. Obviously I've got loads more to learn about this machine (you should see the list of accessories!). But you can see that it cuts well, you can use the fonts already loaded on your computer with no hassle at all and even weld them together like I did for the sentiment on this make.


Don't forget to get yourself a free sign-in at the Silhouette America online store to access all the downloads.

So if you are thinking about adding an electronic cutting machine to your tool kit then I would give a HUGE thumbs up for the Silhouette Cameo, I LOVE using this machine. It cuts beautifully and there is a whole realm of creativity it opens up to you and I'm excited to explore this machine some more and hopefully share the results with you too.

But I would love to know what you think about the electronic cutting machines, do you have one? Do you want one? If so which one and why?

Thanks for popping by.

Kim


[Disclaimer Time: I wasn't paid to write this review, however, I did get a machine to review. But as with all my reviews I always try to give you my honest, unbiased opinion. (Prices correct for the date the blog post went live)]

Thursday 28 March 2013

A Little Bit Of WOW! Embossing Powder Melt-It! And A Giveaway!

*This Post will stay on top until the GIVEAWAY closes (28th March)*
Please scroll down for newer posts


I have a bit of fun to share with you today and a Giveaway too in the form of the WOW! Embossing Powder's Melt-It!


I was curious to have a go with this new product, I think that it has been around since Autumn last year but it was recently launched at the CHA in Jan and you can find a couple of YouTube videos about the product, one from Marion Emberson of Sugar and Spice and the other on the WOW! Embossing Powder website.

So what is it?
It is an embossing powder extender to use with your moulds, shapes cutters, memory frames etc for making 3D items and embellishments for your papercraft, jewellery, altering, mixed media etc projects.

It is a super fine embossing powder, similar to the texture of icing sugar, and it comes in 160ml Jars priced at around £7.75 (at the time of writing this post). It is a white powder but melts to a clear, slightly off-white colour and you add some of your other colour embossing powders to colour it.


You can melt it in a Ranger melting pot, with your heat tool under a pie dish or in the oven (which I've not tried but is one of the methods they show in the website video mentioned above). My preferred method, if I have the room, is to melt it in my Ranger melting pot in a pie dish then use a heat tool from above to keep it fluid as I pour it - I like to mix my options!

You don't need to add that much of the coloured embossing powder to change the colour of the Melt-It and that is where the extender part of the product comes in. It means that you aren't using up too much of the coloured powder which is more expensive gram for gram. But you will be using up the Melt-It! and that is why you need the large pot and I worked with around two small teaspoons of Melt-it! with 1/2 - 1 small teaspoon of coloured powder to make approximately two or three 2 cm diameter buttons.


Also you might find differences in the colour you see in the pot of your coloured embossing powder to what you get when you have melted it in the dish but this is because some of the opaque WOW! Embossing Powders are based on a white embossing powder so they actually melt to a lighter tone when melted in this way - it is nothing to do with the Melt-It!


So if you have used the Ranger UTEEs in your moulds and 3D projects making then you are going to take to the Melt-It! immediately, but even if you haven't used your embossing powders to make 3D items before then have a go, it is a lot easier to do then you might think.

Now, I haven't yet tried to stamp into this product but I believe it has been specifically designed to use with the coloured embossing powders in moulds and shape cutters etc rather than for using in stamping and triple embossing techniques. WOW! do have thicker powders for using with those types of techinques. But I will have a go at stamping into it at some point I'm sure, do let me know if you have stamped into it and what results you have had, I would love to know.


Now one little word of warning, melted embossing powders do harden quite brittle when fully cooled and Melt-It! is no different so if you are making larger 3D objects just be aware that if you put any pressure on them they may snap. But for the smaller items you probably won't even notice and you can always try adding the Ranger Flex product. I was going to give this a go but I could not find my pot of Flex anywhere *sigh* so will have to report back on that one too!

SUMMARY:
WOW! Embossing Powder Melt-It! is great if you want to make your coloured embossing powders go further when you are making 3D embossing powder items in silicone moulds, shape cutters, frames. It is a bit addictive and once you get started you will be pouring it onto or into whatever you can find!

GIVEAWAY!
The important bit! So BIG thank you to WOW! Embossing Powder for donating a jar of Melt-It! for one of my blog readers to have a go with for themselves.

Please do go show them some love over at their Facebook Page or on Twitter or on their blog but before you go remember to add your name and link in the InLinkz widget below to be in with a chance to win and I will pick someone randomly on 28th March 2013. Don't forget to tell your friends as well!

Good Luck!

Kim

[Disclaimer time: I'm not affiliated with any of the companies or products mentioned in this blog post. I did get a free pot of WOW! Melt-It! Embossing Powder to try out for myself and for one of you guys to win but still, as with all my reviews, I try to give you my honest unbiased thoughts.]