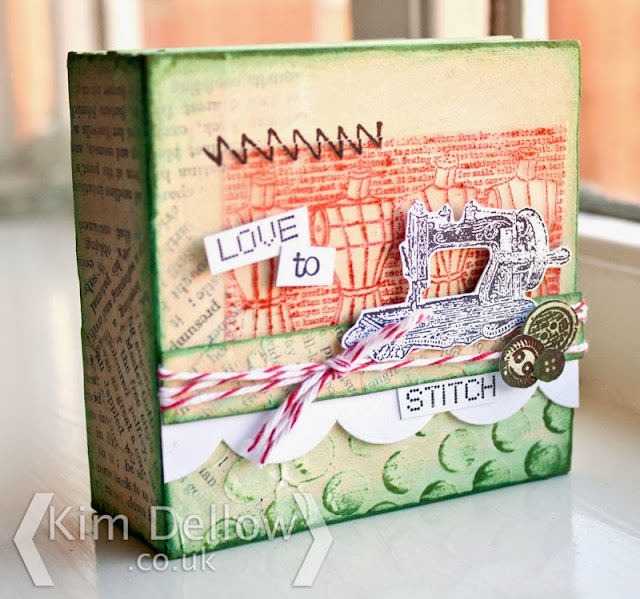
Welcome to part one of my Love To Stitch Mini Book Tutorial series.
I've got a mini-book for Creative Expressions to share with you and as I'm working with the Umount Vintage Sewing A5 Stamp Plate I thought I might go for a sewing theme - it seemed logical!
And, well, sewing does hold a special place in my heart.
My mum is a stitcher, both her mum and dad were stitchers, it is just in my blood.
I'm altering this mini book over the next few weeks and sharing the steps of this stitching-dedicated journal with you guys.
What You Will Need:
Gesso
StazOn ink pad - Blazing Red, Jet Black
Old book pages
Scallop border die
Tools - Sponge, brushes
Golden Soft gel
Marker pen for writing on acetate
Before I start I thought I would give you a closer look at the Eco-Green Crafts Board Book:
The book is made up of six pages, so that is 12 surfaces to alter plus the spine. Each page is made of layers of paper to a thickness of 3 mm.
So the 4" by 4" book is around 3.5 cm thick and stands freely, which makes it nice and easy to photograph! (Yes, that is a jar of Marmite in the background, I'm working in the kitchen again).
Step One - Preparing the surface
I started by glueing torn pieces of old book pages over the spine and part of the back and front of the cover. I also covered a strip of spare card too. Then let the glue dry completely.
Step Two - Some Gesso Texture
I then applied a layer of gesso to the cover, spine and sides of the book, only a light covering to blend the book page collage into the surface. Then once this layer was dry I added a thick layer of gesso through the large Polka Dot mask and let it dry completely, you can also use texture paste if you like.
Step Three - Adding Colour
Next stage is to add a bit of colour, I added a layer of the Sand Eco-Green Crafts acrylic paint with a piece of kitchen sponge and let it dry before adding the Tide Pool paint to the outer edges. I also covered the strip of card too.
Step Four - Adding Depth
Once all the paint is dry I then brushed the Ranger Archival Olive ink pad over the edges and the gesso texture of the mini book and the strip of card too.
Step Five - And Now The Stamping Part
First up, I stamped the row of dressmaker dummies with the lettering background on acetate with StazOn and cut it out to stick as the background on the front cover. I then cut a piece of white card with a scallop edge die and layered it with the old book page strip, wrapped with Baker's twine, and stuck them to the front.
I stamped the sewing machine, buttons and sentiment, cut them out and stuck them to the front cover then finished with a touch of stitching stamped over the acetate background with StazOn and finished with a marker pen that writes on acetate.
Thanks for popping by and see you next time for Part Two!
Kim
Related Articles:


