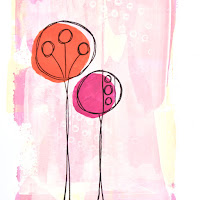
I actually made this project way back in March and the photos have been sat, all processed and ready to go, on my computer since then. If you came to my Make and Take with PaperArtsy back in April at Crafting At Ally Pally then you might recognise it as the bases of one of the Make and Takes I was sharing at the show.
If you did come to my Make and Take for this project then you will see a few extra details and some slight differences that I just did not have time to share in the half hour that we had together, so hopefully you will enjoy seeing them here instead. If you didn't get a chance to play along with the Make and Take then this will be the first time you have seen this, so I hope you enjoy it also!
[I do use affiliate links and there are some in this blog post.]
For this project I have worked in one of my junk journals but you can easily use other art surfaces like paper, chipboard, gesso board, well the choices are endless! If paint can go on it then this project will work on it too!
Here is what you need:
PaperArtsy Eclectica³ {Kim Dellow} Stamps sets EKD01 and EKD02 (US/Worldwide Shoppers | UK/EU/Worldwide Shoppers)
PaperArtsy Fresco Finish Acrylic Paints - Snowflake; Blueberry; Cherry Red; Mermaid; Spanish Mulberry {Discontinued} (US/Worldwide Shoppers | UK/EU/Worldwide Shoppers)
Art journal or similar
gesso (optional)
ordinary copy paper for masks
scissors
Jet Black Ranger Archival ink pad
Plastic card scraper (old credit card, gift card etc) or a palette knife
brush
palette
sponge
water spray and an old toothbrush to clean paint off stamps
Masking/ Washi tape
craft knife
pencil
acrylic stamp blocks
black Sakura Pigma Micron
Step 1: Prepare the background
If you need to, add some gesso to your surface and let it dry, you don't need to add gesso if your surface doesn't need priming so skip this part of the step if that is the case. As I am working in my junk journal I added a layer of gesso before I started to tone down the print on the page just a bit.
Start building up the background colour using the paints and apply them with the plastic card or a palette knife. If you aren't sure how to use a plastic card to apply paint then have a look at my 'Get The Faux Print Look' video, that will give you some tips.
I added a drop of paint to the palette then ran the edge of my plastic card, or palette knife, through the paint and scrapped the paint across the page. It is a great way to get different textures and I love how thinly you can get the paint with this method.
Step 2: Stamp some texture
Next a little bit of paint stamping with my texture stamps from both the PaperArtsy EKD01 and EKD02 sets. I love stamping in paint to add texture and it is a technique you will often spot me using at the moment, I used it in my recent 'Make A Layered Tag' video if you want to see it in action.
There are different ways you can do this, my favourite is to spread the paint really thinly on the palette and dab the stamp into the paint then onto the surface. You need to work relatively quickly as the paint will dry out quickly when spread thinly.
You also do not want to leave the paint on the stamp as it will dry on it so have a spray bottle to hand before you start and spritz the stamp with water after you have stamped with it to keep the paint wet. Then you can wash off the residue paint when you have a minute. I usually clean it off then and there with some light scrubbing using a toothbrush, job done!
Step 3: Define your centre
So for this design I've defined a centre section to the page to put the image on, almost like a little window in the page. To achieve this, and to make the section pop, I've used a mask and applied more of the lightest colours through that mask.
First make you mask. It helps if you have a piece of copy paper about the same size as the page you are working on. Making sure that the paint on the page is dry, place the paper over the page and draw out the shape you want the centre section to be. I went with a rounded square but it can really be anything and some of my Make and Take folks came up with some fabulous shapes, hearts, clouds, wibbly wobbly shapes, so go with what you fancy!
Remove the paper from the journaling page then cut out the middle, following your pencil line, using a craft knife or scissors. It is the frame you want to use as a mask so try not to cut into it and instead cut into just the middle so that you keep the frame intact and easy to manage. If you do cut into the frame don't panic, use some tape to stick it together again once you have finished cutting.
Now hold the frame back over the journal page and apply the paint through the frame mask with a plastic card or palette knife.
Tip: To decrease the amount of paint splodging under the mask, only apply a small amount of paint over the edges and work from the outside of the paper frame into the middle of the space. Build up the colour in layers at the edges.
Step 4: Make more masks!
Whilst the paint is drying you can get on with making the masks for the images you are going to use in the centre.
Stamp out the long flowers and the clouds from the EKD02 set onto spare paper and use a craft knife to remove the centre of the shapes. A craft knife is easier but you can use scissors if you prefer.
Step 5: Start building up the central image
To build up the central image we are going to use the masks and paint through them. If you want to keep it simple then just go with one of the colours such as the Blueberry, Cherry Red, or Spanish Mulberry (or something similar as this colour is being discontinued!) to fill the flowers. If you are looking to add a bit more texture to your page then use the Snowflake paint as I have done for my page here.
Again, only apply a small amount of paint over the edges of the masks and work from the outside into the middle to cut down on the paint splodging underneath the mask. If you want to be super precise then you can do it the 'proper' way and use a stippling brush and stipple the paint through the mask. But if you are careful then the ordinary brush method can work, it is just down to a bit of patience and working from the outside in to the centre.
Step 6: Stamp the images
As well as painting the flowers white I have also used the cloud masks and painted them with Snowflake paint too. Then I took the small cloud mask, turned it on its side next to the tallest flower and used it to paint a little white tab. This is going to be the space for the sentiment.
Once all the paint is dry it is time to stamp the lines and details in. So grab your frame mask again and place it back over the page. This will protect the areas you don't want to get any stamped image on.
Lining up your stamping with the masked off images on the page can be a little tricky! You really don't have to get the two perfectly coordinated and in fact I really like the slightly off look as it can add another level of interest to the piece.
Often what I do is bring my eye level in line with the page, don't move the page but do move yourself! Then lower the stamp in place slowly keeping my eye on both the image and the stamp. It takes a bit of practice. Remember you want the stamp to be parallel to the surface when it touches to avoid smudging, but you can lever the stamp in place without touching the surface, then straighten it up and stamp.
Alternatively, if you have a MISTI that will fit your project you can always use that! Or you can just best guesstimate, stamp as you would normally and love the imperfections, which works just as well in my opinion!
You can also see this type of stamping over blocks of colour in action in my 'Get The Faux Print Look' video.
Step 7: Fill in the colour
If you used Snowflake white paint through your flower mask then now is the time to add a bit of colour to your flower heads. If you just went with the colour in the first place, instead of the white step then skip on over to Step 8.
I added a gradient of the Cherry Red and Spanish Mulberry with a small brush to my flower heads.
Step 8: Final touches
Add some final touches once the page is dry by placing the flower masks back over the flower heads and stamping out the texture stamps with paint through the masks, just as you did with the background texture. Then remove the masks and let the paint dry.
Stamp up the 'Let Yourself Grow' sentiment from EKD01, quickly add masking tape or Washi tape over the 'Let Yourself' part and stamp the 'Grow' part in the little white tab on the larger flower.
To finish the page use the marker pen to add a border around the frame and the little sentiment tab.
I love making my own masks it is great fun, so easy to do and a great way to stretch your stash. Don't throw away your paper masks after you have done the project, they will last a few more projects. If I've made the mask using stamps then I usually store them in the bag with the stamps. For other masks I have an envelope to keep them all together so that I know where they are.
As usual do let me know if you make anything using these techniques or my stamps. I always love all of your shares, so give me a shout if you have something you want to share.
If you liked this project then you might like these projects too:


Happy creating!
Kim
Come And Connect With Me:
YouTube
My Shop
Join My Newsletter!


Love how,you framed your stamps Kim and fabulous colour combination X
ReplyDeleteThanks so much Tracy :) x
DeleteWonderful blog Kim. Thank you for sharing, definitely going to have a go at this layout. Xx
ReplyDeleteHugs
Amanda openshaw. X
Thanks Amanda, I'm looking forward to seeing your take on this LO :) Kx
DeleteAbsolutely fab tutorial hun, thank you so much for sharing. I've not been brave enough to get this messy with my journal yet, maybe it's time.....! xx
ReplyDeleteThanks Squirrel, hope you have some fun trying out messy!
DeleteFab tutorial Kim, some great techniques to try out - thanks for sharing Xx
ReplyDeleteThanks so much Claire :) Glad you liked it!
DeleteKim