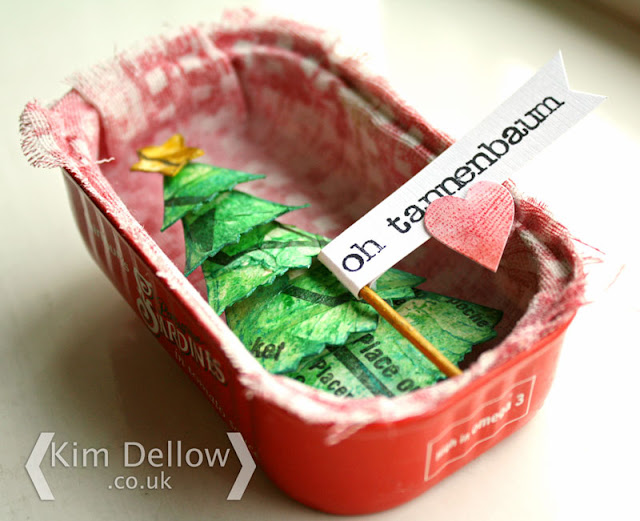
Putting up our Christmas decorations this weekend I came across a project that I did last year for Faber-Castell Design Memory Craft.
Some of you might remember it, I had a step by step tutorial for it too but the tutorial only went up on the Design Memory Craft blog and I thought it might be fun to post it here on my blog.
I've added some more details to the tutorial here but if you want to see the original post then pop on over to the Design Memory Craft 2012 12 Days of Christmas, Day 5: Christmas in a Sardine Tin.
You Will Need:
Sardine Tin - empty and clean!
Gesso
Card - white
Old sewing pattern tissue
Fabric
Gingham rubber stamp (optional)
Glue
Water spray bottle
Bulldog clips
Cocktail stick
Bulldog clips
Cocktail stick
Colour:
Deep Scarlet Red 219 Stamper’s Big Brush pen
Dark Chrome Yellow 109 Stamper’s Big Brush pen
Leaf Green 112 Stamper’s Big Brush pen
PITT Gold 250 Artist Pen
PITT Metallic Green 294 Artist Pen
Metallic Mint Gelato
Metallic Gold Champagne Gelato
Step 1 - Prepare The Tin
So you have eaten the sardines, or feed them to your cat, cleaned the tin and dried it, now you need to prepare the inside ready to stick on the fabric. Either cover it with gesso or use a sturdy multi-purpose glue to stick on some white paper and let it dry completely before starting the next stage.
Step 2 - Prepare The Fabric
You can use any fabric you might already have and if you have a nice patterned fabric already then trim it so that it is bigger then the tin then move on to Step 3.
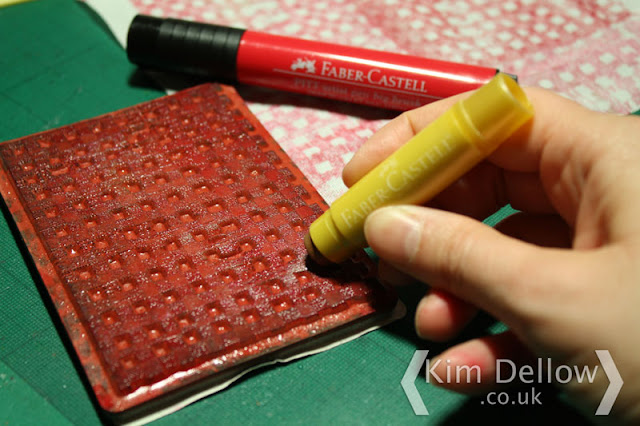
I decided to use a blank loose weave canvas type fabric and decorate it myself. I stamped a pattern on it using the Gelatos and Stamper’s Big Brush pen.
Step 3 - Cover The Inside Of The Tin
Paint the inside of the sardine tin with glue and start pressing the fabric into the tin. Smooch the frabic up into each of the corners and take your time covering all the walls.
Bulldog clips or clothes pegs come in handy holding the fabric in place whilst the glue dries.
Step 4 - Make Your Tree
Cover some card with old sewing pattern papers and cut out your Christmas tree shapes. Then use your colouring materials to colour the pieces. The Gelatos and Stamper’s Big Brush pen work well because they are watersoluble so are translucent and you can still see the sewing pattern
You can add a bit of sparkle too with a metallic pen like the PITT Metallic Green 294 Artist Pen, I've skimmed it over the edges and along any folds in the papers.
Make a little star using the same method then round the tree over a pen and stick it in the tin.
Step 5 - Make The Banner
Stamp or write your sentiment and colour a cocktail stick. Wrap the sentiment strip around the cocktail stick and glue it into the tin. Then make a little heart cut from coloured card to finish the make.
Hope you enjoyed this project revisit. Now I'm wondering what other Christmas scenes I could put in a tin, what do you think?
If you like this tin, please do checkout some of my other tins:
Kim


This is such a fab and imaginative project, Kim. I love that you stamped the fabric yourself and it's a great idea to use fabric to cover any rough edges on the tin. Thanks for posting it,
ReplyDeleteLucy x
P.S. What if I don't have a cat?!
Fabulous project Kim. I think I'd enjoy creating one of those. Thank you for the tutorial. Hugs Rita xxx
ReplyDeleteThis is sooo adorable, Kim!
ReplyDeleteI love your tree in a tin and I will surely make one of these - so thanks for the great tutorial too! So inspiring and gorgeous!
Greetings from Vienna,
Claudia x
Super fun! What a fabulous little ornament and from such a stinky beginning ;) It looks wonderful!
ReplyDeleteFantastic idea Kim, thanks for the tut.
ReplyDeleteHugs Linda
Such fun :) and thank you for the tutorial
ReplyDeleteVon ☺
Hi Kim, I'm loving this project.
ReplyDeleteI have collected these tins but couldn't decide what to do with them so thanks for the inspiration.
Merry Christmas, Angela X
Great to see your sardine tin tutorial Kim, looks fiddly but fun :-) xxx
ReplyDelete