Showing posts with label Creative Expressions. Show all posts

Thursday 28 November 2013

Thinking Of You For Creative Expressions

Hey up lovely folks, so yesterday I posted a make for Creative Expressions and it is your lucky day 'coz I have another one to share with you today to finish off the November DT makes using the Umount Winter Flower stamp set.


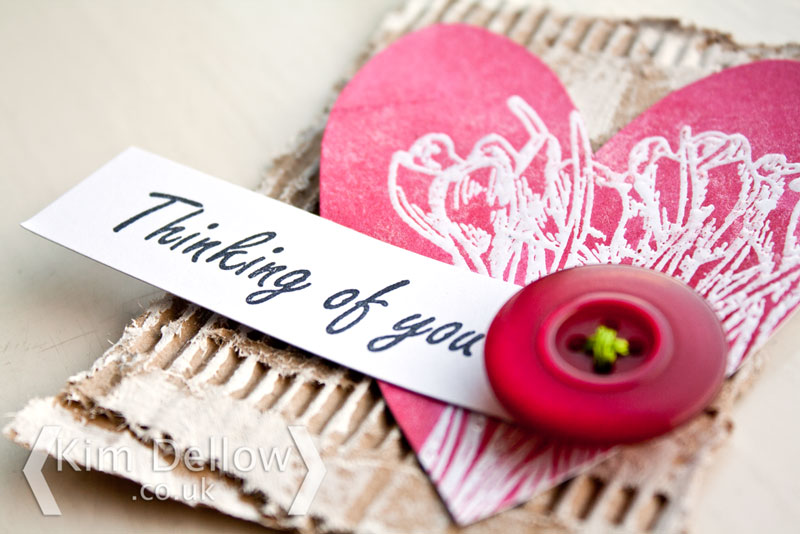
It's an ATC and I wanted to share with you the making of this one.

You Will Need:
Corrugated cardboard
Clear embossing powder
VersaMark
Gesso
Brush
Paper
Scissors
Pencil
Threaded button
Heat tool


Step 1 - Make The ATC


Tear the cardboard to ATC size (3.5" x 2.5") and remove the top layer to show the corrugations. Then add a rough coating of Gesso, don't be afraid to splodge it on unevenly.


Step 2 - Clear Emboss The Flowers


On a spare piece of white card clear emboss one of the flower stamps from the Winter Flowers Stamp set.


Step 3 - Add Some Colour


Paint on some colour from the Lava Red Cosmic Shimmer Mist and wipe off excess mist with a cloth.


Step 4 - Cut Out A Heart


Make yourself a heart template from spare paper and draw out the heart shape over your image, then cut it out.


Step 5 - Add The Sentiment


Stamp out one of the sentiments from the Winter Flower stamp set with the Archival Jet Black ink pad and trim it to fit the ATC.


Step 6 - Put It All Together


Stick the heart and sentiment to the ATC and finish with the threaded button. The Cosmic Shimmer glue works a treat, even with the button.


Thanks for popping in.

Catch you later.

Kim


Wednesday 27 November 2013

Winter Birthday For Creative Expressions

Hey Guys, Wednesday is Creative Expressions day for my blog, as you know, and this week I've used another flower from the Umount Winter Flower stamp set.


The sentiment is also on the stamp set too. All the colour is from Archival ink pads and you might have spotted a bit of old book page in there too!

Catch you later.

Kim

Friday 22 November 2013

Magazine Time And A Last Call For The Creative Expressions Giveaway

Friday is with us again and I have a magazine shout out for you all.

But before I do the shouting I just wanted to say a HUGE thank you for all the congratulations messages you have sent me about the news of my recent winning of the Cox & Kings Art competition. You are all really sweet and I'm so grateful for all your lovely words.


So on with the shout out! If you are looking for some weekend reading checkout issue 101 of Papercraft Essentials.


It is full of lovely inspiration as always and the keen eyed of you will already have spotted the amazing colouring talent of Elaine Hughes on the front cover! You will also find a gorgeously inky masterclass from Tracy Evans. Just naming a couple of the amazing folks who are in this month, there are tons more.

On my part I'm trying to get us all out of our fear of writing our own sentiments (please don't tell me I'm the only one that has that fear?!) and using our own lettering more in our makes - hope you like it!


Before you hop away you won't forget to sign your name up for the Creative Expressions giveaway will you? It closes a 5pm tonight so click the picture below to go straight to the post and add you comment.


Have a lovely Friday.

Kim

Wednesday 20 November 2013

Love To Stitch Mini Book Tutorial - Part 2

Welcome back to my free Love To Stitch Mini Book Tutorial series.

A couple of weeks ago I shared with you the making of the cover page of my stitching-inspired mini book altering in part 1 of my new tutorial series for Creative Expressions.


I'm back again this week to share with you the making of pages 1 and 2 in Part 2, so sit back and enjoy!


I wanted a simple double page spread to start the inside of the book.


As you can see from the front cover I'm not going for a totally vintage look with the Umount Vintage Sewing A5 Stamp Plate, so I've not gone overboard with the distressing,


but I have added some distressed colouring for texture and to bring the book together.


What You Will Need:
VersaMark ink pad
Clear embossing powder
Gesso
Old book pages
Tools - Sponge, brushes, blending tool
Heat tool
Golden Soft gel
Hole punch
3D-foam


Step One - Preparing the Surface


Just as I did with the front cover I've started these pages with an old book page collage.

Glue old book pages over a small section of the left hand side of page 1. Once the collage is dry use the large polka dot mask and some thick Gesso to add some large, raised dots. Again, let the dots dry completely then use a sponge to smear a light layer of the Sand paint over both pages.

Pop over to Part 1 of this tutorial series to see how to make the dots and paint with the sponge in more details in Steps 1-3.


Step Two - Add Texture With Some Stamping


Once the pages are dry use the Coffee Archival ink pad and the hessian stamp from the kit to layer some stamping texture on the bottom right-hand corner of page 2.

TIP - For some of the stamping you may need to hold the page open and press with one hand on the stamp and the other on the back of the page to give a firm surface for the stamping.


Step Three - Make A Mini Tag


Trim a long, thin tag shape from card and heat emboss the tape measure stamp with clear embossing powder. Use the Distress inks and the blending tool to colour the tag and rub any excess ink off of the embossing with a damp soft cloth to make sure that the embossed relief 'pops'. 

Don't forget to colour the top section of the back of the tag as well as this will be poking out the top of the book when it is finished.


Step 4 - Add A Bit Of Balance


Use the blending tools and the Distress inks to add colour to the polka dot texture on page 1. Then rub the distress ink pads and the coffee Archival ink pad directly over the raised areas for even more texture.

TIP - This might take a long time to dry so try the heat tool gently (don't over heat the area) and don't shut the book until you are sure it is dry. Put a spare piece of paper between the pages if you have to close it before it is dry.


Step 5 - Finish the Tag


Wrap the Baker's twine around the bottom of the tag and tie off. Then cut three small holes in the top of the tag with two holes next to each other and one hole above and in the middle. Now thread some Baker's twine from back to front through the bottom two holes and then thread both ends back through the top hole and tie a knot in the end.


Step 6 - Stick It All Together


Stick the tag to page 2 with 3D-foam, stamp the sentiment with the Vermillion Archival ink and tear the edges before sticking to the tag.

Page 1 and 2 finished!


I'll be back in a couple of weeks to share some more pages.

Thanks for popping by.

Kim


Related Articles:

Tuesday 19 November 2013

Creative Expressions Couture Creations Blog Hop

Welcome to the Creative Expressions Couture Creations Blog Hop.

If you hopped here from lovely Kerry Hickton's blog then you are on the right track. If not then hop on over to the Creative Expressions Blog to get started. There will be lots of inspiration and prizes on the way so don't forget to comment on all the blogs in the hop.

As some of you might already know Creative Expressions have recently taken on some new DT members so we are celebrating the new DT but not only that, if you watched Julia Watts' Create and Craft shows over the weekend then you would have seen the Couture Creations 3-in-1 Dreamboat Collection. So our blog hop this week is also showcasing the Couture Creations 3-in-1 Dreamboat collection.


I've used a combination of masking and stamping techniques to get the sweep of stamping and colour on the Foundations card.


I've used the Butterfly stamp and dies from the set to layer the butterfly.


Ok so I mentioned some prizes didn't I? What? You are telling me you didn't read the bit at the top? D'oh! Well there are some prizes on the hop...

Prizes: 
There are 10 prize bundles plus a Star prize. Each of the bundles is worth over £10 and contains a selection of Glitters, Glue, Embossing Powders and a Singles Stamp from Creative Expressions. 

The star prize is worth £30 and will be the same as the other prize bundles, PLUS one of the 3-in-1 Dreamboat Collection Sets! 


The prize up for grab on my blog is:
Your Carriage Awaits Pre Cut Stamp 
Glitter 
Cosmic Shimmer Dries Clear Glue (a must have!)
Cosmic Shimmer Silver Shine Details Embossing Powder 


To be in with a chance of winning a prize leave a comment on each blog, the winners will be announced on the Creative Expressions News blog once the Hop has ended on Friday, 22nd November 2013 at 5pm. 


Next on the hoppity hop is the fabulous Trace Metcalfe.

Enjoy and good luck!

Kim


Wednesday 13 November 2013

Beautiful Snowdrops And Some News

It is wonderful Wednesday which means it is now Creative Expressions day on my blog. My make this week uses the Umount Winter Flower stamp set again, you might remember the Ooozing Halloween card I made with this stamp set a couple of weeks or so ago?

This time I've gone for something a little prettier, and with less blood, and used the lovely snowdrops which are one of my favourite flowers by the way.


I've done a bit of paper piecing with the snowflakes and added some dimension with 3D-foam.

The sentiment is on the set as well as part of a larger phrase and I just masked part of it off to stamp the 'With Love' section.


Now before I go, a bit of news for all you Creative Expressions fans, mark 19th November on your calenders as there will be a Couture Creations Blog Hop starting at 10am on Tuesday. There will be LOADS of prizes so you are definitely going to want to take part!


Catch you later craftinators.

Kim

Friday 8 November 2013

Check This Out - Going All Space Age

Yesterday saw the new issue of Simply Cards and Papercraft, 117, hitting the shop shelves and I have to tell you, when I got my copy it put a HUGE smile on my face!

Love it to bits! Check out the photos of my Galaxy-themed makes, Tym Leckey and the Simply Cards & Papercraft team have dressed them brilliantly! I'm sure they will make you smile too! Tee hee!


Ok, well I am a BIG science nerd so this was right up my space avenue! Sooo want one of those astronauts!

I've got two cards in the Cardmaker's challenge too, just love what all the guys have done with the New Year theme, all so different and inspiring. I went for a sort of hot and fiery sunshine look with the sunrays from the Paperbabe High in the Sky Stamp set.

There is an amazing Kaisercraft cover gift too with a stamp, papers and luggage tags, and lots of beautiful inspiration from everyone, so really - you NEED to get this mag!


Before you rush out to your newsagents you might want to check out the Creative Expressions Facebook page, they have their regular Friday before 5pm giveaway. Go sign up!

(I'm being so bossy today aren't I?!)


Ok, I'm out of here, still have lots of work on my Cox & Kings Competition piece - Gulp!

Have a fun Friday.

Kim

Wednesday 6 November 2013

Love To Stitch Mini Book Tutorial - Part 1

Welcome to part one of my Love To Stitch Mini Book Tutorial series.

I've got a mini-book for Creative Expressions to share with you and as I'm working with the Umount Vintage Sewing A5 Stamp Plate I thought I might go for a sewing theme - it seemed logical!

And, well, sewing does hold a special place in my heart.


My mum is a stitcher, both her mum and dad were stitchers, it is just in my blood.


I'm altering this mini book over the next few weeks and sharing the steps of this stitching-dedicated journal with you guys. 


What You Will Need:
Gesso
StazOn ink pad - Blazing Red, Jet Black
Old book pages
Scallop border die
Tools - Sponge, brushes
Golden Soft gel
Marker pen for writing on acetate


Before I start I thought I would give you a closer look at the Eco-Green Crafts Board Book:


The book is made up of six pages, so that is 12 surfaces to alter plus the spine. Each page is made of layers of paper to a thickness of 3 mm.


So the 4" by 4" book is around 3.5 cm thick and stands freely, which makes it nice and easy to photograph! (Yes, that is a jar of Marmite in the background, I'm working in the kitchen again).


Step One - Preparing the surface


I started by glueing torn pieces of old book pages over the spine and part of the back and front of the cover.  I also covered a strip of spare card too. Then let the glue dry completely.

Step Two - Some Gesso Texture


I then applied a layer of gesso to the cover, spine and sides of the book, only a light covering to blend the book page collage into the surface. Then once this layer was dry I added a thick layer of gesso through the large Polka Dot mask and let it dry completely, you can also use texture paste if you like.


Step Three - Adding Colour


Next stage is to add a bit of colour, I added a layer of the Sand Eco-Green Crafts acrylic paint with a piece of kitchen sponge and let it dry before adding the Tide Pool paint to the outer edges. I also covered the strip of card too.


Step Four - Adding Depth


Once all the paint is dry I then brushed the Ranger Archival Olive ink pad over the edges and the gesso texture of the mini book and the strip of card too.


Step Five - And Now The Stamping Part


First up, I stamped the row of dressmaker dummies with the lettering background on acetate with StazOn and cut it out to stick as the background on the front cover. I then cut a piece of white card with a scallop edge die and layered it with the old book page strip, wrapped with Baker's twine, and stuck them to the front.

I stamped the sewing machine, buttons and sentiment, cut them out and stuck them to the front cover then finished with a touch of stitching stamped over the acetate background with StazOn and finished with a marker pen that writes on acetate.


Thanks for popping by and see you next time for Part Two!

Kim


Related Articles: