Showing posts with label Halloween. Show all posts

Tuesday 9 October 2012

Sparkle Creations Rubber Stamps Sketch Challenge

Hello lovely fluff bundles, my post today is something a little new
for my blog.

I'm guest DTing for the lovely Sparkle Creations Rubber Stamps this month so I have some cute samples to show you over the next few weeks. I'm kicking off today with this make for the Sketch Challenge over at the Sparkle Creations Blog.


This is Franken Josh and he comes with the sentiment too.


I think he might be sneaking up behind you, probably to nick those sweets out of your hand!


Go pop on over to the Sparkle Creations blog to checkout the challenge, it's open until 21st Oct 2012.

Meanwhile, you might like to pop around these yummy blogs to see more inspiration for the Sparkle Creations Sketch Challenge...

Kim Dellow - That's me!

Scare you later.

Kim

Thursday 27 September 2012

Getting Spooky In Morticia's Gruesome Laboratory

Hey everyone, Zombie Kim here to give you a guided tour of Morticia's Gruesome Laboratory, please don't touch any of the bottles in the lab, you have no idea where they have been or what is inside them.

Please take your time to look around Morticia's Lab but if you should hear the terrifying klaxon, which is the wailing sound of many screaming voices, then you should know that your time on this planet has been numbered and there is no escape.

Enjoy your tour!

A Halloween card with Make It Crafty digi-stamps

When Morticia isn't in her lab brewing and stewing she can be found hanging out with her monster pals in the Make It Crafty Mini MonstaGalz stamp set.

Close-up of A Halloween card with Make It Crafty digi-stamps

Her lab assistant Frankenstein, or Frankie to his friends, shoots pool with his monster gang on his days off over in the Make It Crafty MonstaBoyz set.

Close-up of A Halloween card with Make It Crafty digi-stamps

He doesn't really have a speech impediment, he just likes living up to people's expectation of an evil laboratory assistant, it was in the job description after all.

Sketched Lab equipment

They kitted out their evil lab at very competitive rates from Zombie Kim Dellow Laboratory Equipment Supplies Ltd and their wallpaper was from the Echo Park Apothecary Collection with the extra Halloween greeting from the Artistic Outpost Haunted Halloween set.

That about wraps up our tour, thanks for coming and if you have any questions, now is the time to keep them to yourself. 

Have a safe trip home!

Uh oh! I think I hear some wailing - you might want to run to the gift shop...

Kim Dellow blog post signature

[21st Oct 2015 - This post has been edited to bring the links up to date and remove old, out of date information]


Come And Connect With Me:

YouTube

Instagram

My Shop

Join My Newsletter!

Facebook

Pinterest

Twitter

Tuesday 18 September 2012

La-La Land Crafts Vampire Is Awake And Coming to Bite You!

Mwahahahah

Back again, as promised, with another scary La-La Land Crafts make...

Be Afraid...

Be Very Afraid...

Are you prepared to meet the new Vampire Luka?

Perhaps you should go grab some garlic from the kitchen before you view this card?

Ok, well I did warn you...


*Shiver*

He lives in that Spooky House on Blood Hill, and is never seen during the day. The kids all know not to retrieve any lost balls from his land.


But all he wants to do is wish you 'Happy Haunting' for Halloween.


Oh, and suck your blood of course!

It is enough to send you batty! Tee Hee!

(I'm thoroughly spooked now - off to hide behind the sofa for an
hour or two).


Monday 17 September 2012

La-La Land Crafts Halloween And Christmas Release

It's new release day for La-La Land Crafts today - all ready for a super cute Halloween and Christmas!

I've made two cards for this release and I thought about posting them both today on my blog, but in the end I decided that I would post one today and the other one tomorrow. But if you pop on other to the La-La Land Crafts blog you will see both makes along with all the lovely makes from the DT and all the new release images too.

So let me introduce you to Flying With Marci and the new release La-La Land Crafts dies Scary Tree and Frightful Fence.


Flying Witch Marci comes with sentiments, including this one and some beautiful star accessories too.


The scary die shapes have been cut in textured black card and then I dry-brushed some white acrylic paint over the edges to give it a wild and wind-swept look. I then coloured the white paint purple with a Hero Arts Neon ink pad.

Don't forget to check out all the lovely new La-La Land Crafts releases and if you check back here tomorrow be prepared for a FRIGHT!

Mwahahaha!


Saturday 12 November 2011

Review - PanPastel Colors And An EXCLUSIVE OFFER!

[This post is sticky; Please scroll down for newer posts]

I am so excited to be able to share this with you today, I've been barely able to contain myself! If you read nothing else on my blog for weeks, you are going to want to get to the end of this post as I have an EXCLUSIVE SPECIAL OFFER for all my blog readers courtesy of the kind people at Your Creativity Store!

So biccys and tea at the ready...

PanPastel_Artists_Pastels_REVERSECOMPRESS.gif

Probably like yourselves, I've tried various pastels (also known as chalks) in several formats, hard, soft, sticks, pencils and compacted in boxes like eye-shadow. I enjoy using some like the pencils but have a bit of a love-hate relationship with some of the others like the sticks because of the way that they feel and the colour and covering that some of them give. So when I came across PanPastel Color I thought it might be time to reacquaint myself to working with pastels.
fivecoloursetpanpastel.jpg

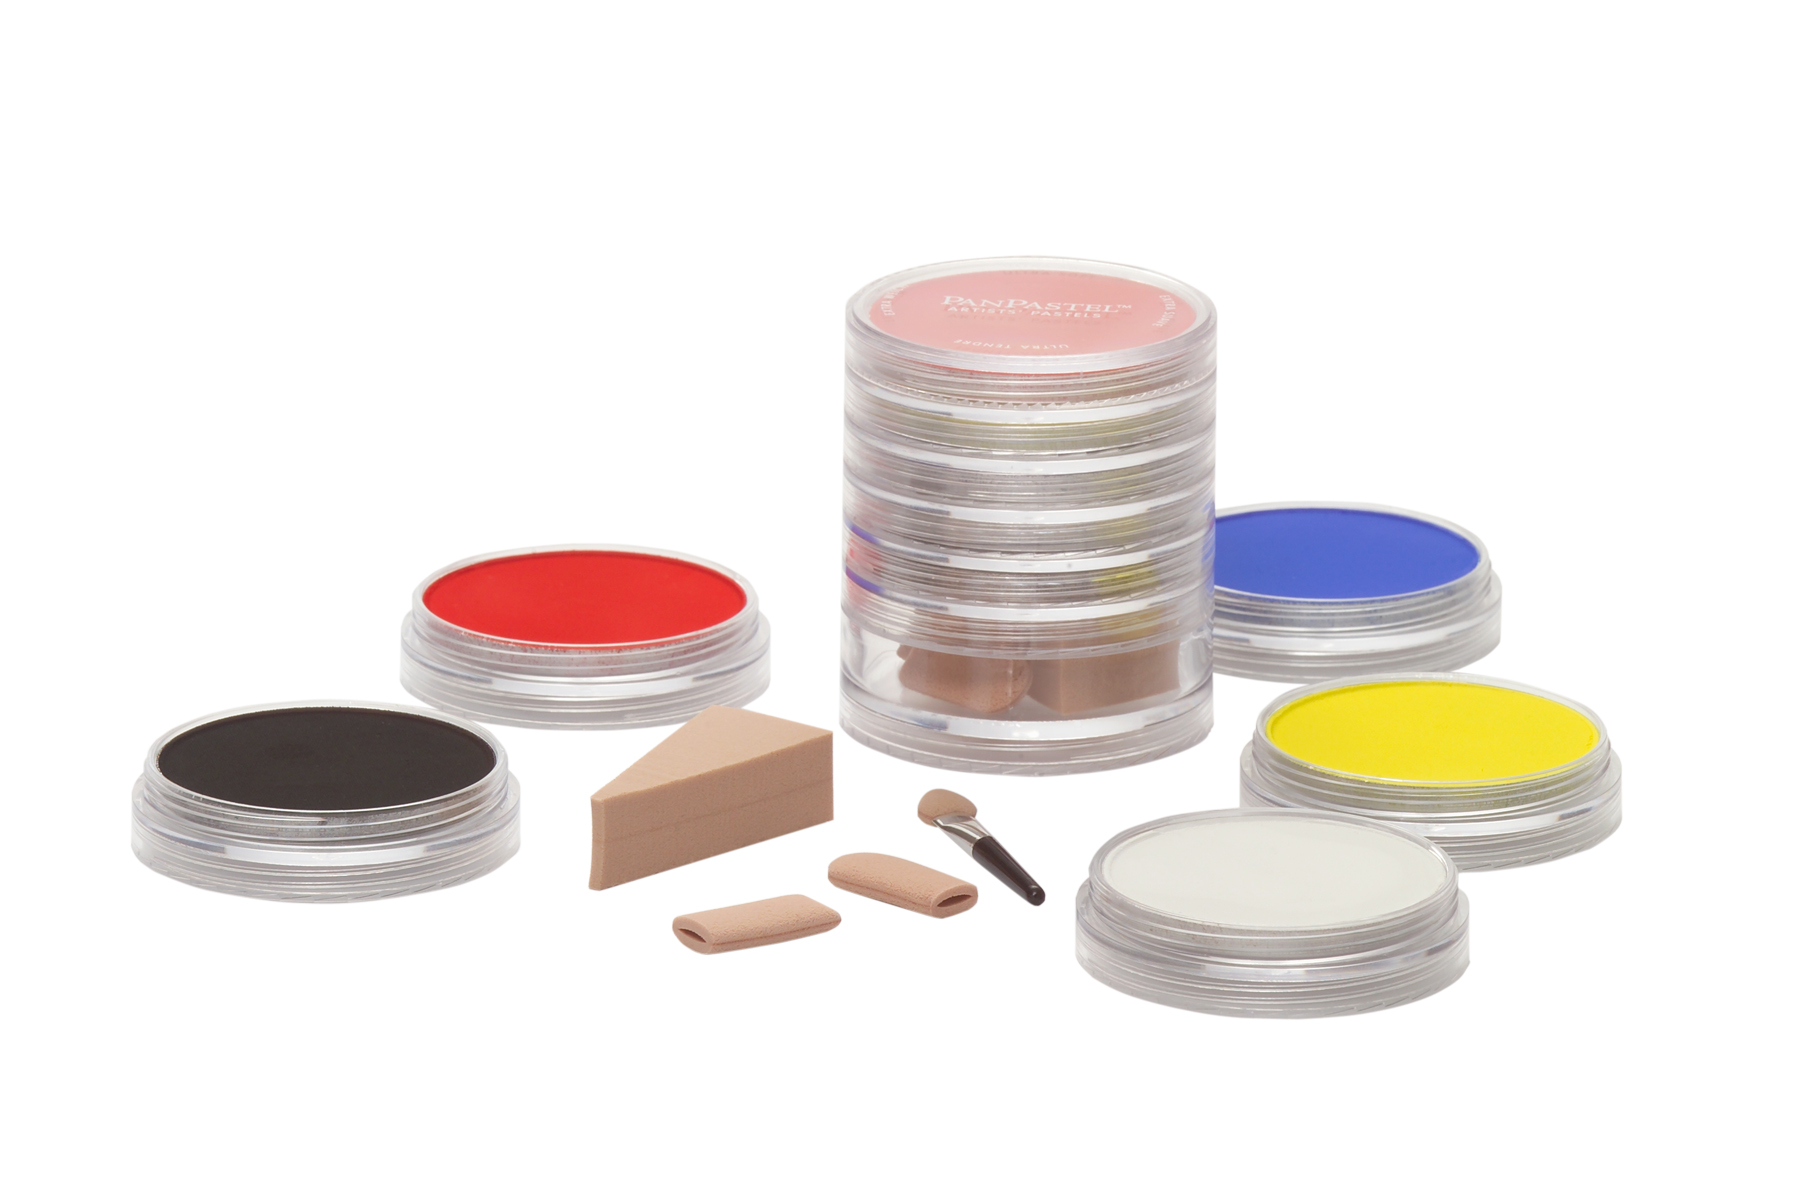
(Copyright PanPastel Colors via www.yourcreativitystore.com)

What Are PanPastel Colors?
For those of you that haven't come across them yet, they are an artist-quality soft pastel compacted into a plastic pot or 'pan'. They have been available to artists for a few years but are now starting to hit the crafting market. Being a bit of a science nerd, I quite like knowing the intricacies of the materials I work with - many don't, so forgive me for the next bit! Now as I understand it all pastels are basically pigment, filler (e.g. chalk) and binder but it is the proportions of each, the quality of the base materials and the way they are put together that makes the difference to the end product (and the price!).

According to the PanPastel Colors website what makes PanPastel Colors unique is that they are specially formulated with less filler and binder so have a higher concentration of the artist-quality pigment. This formulation means that they are very soft, generate less dust and give a better pigment load (concentration of colour) and coverage than other pastels. Oooo...gonna need to try them out then!

Working With PanPastel Colors
Ok non-science nerds - eyes front!


PanPastel Colors come in 20 pure colours and then each pure colour has a tint (lighter), a shade (darker) and an extra dark shade - a link to the colour chart is on the Your Creativity Store website. That means there are 80 PanPastels currently available but considering that they all blend well with each other the colour possibilities are enormous. There are some specially designed tools for appling the PanPastels called Sofft Tools, but more about these in a minute.

Well, straight away I can easily say that I love the colour choices, for us crafters particularly there are some bang on trend colours on offer. The first thing I did after 'ooing' and 'ahing' over the colours of course, was to see how the colour laid down. I used the cartridge paper in my sketchbook which isn't totally smooth and has some tooth (roughness of the surface) but isn't your usual high tooth pastels paper. Pastels usually like something to hold on to, so very smooth paper can be a no-no. Another advantage of PanPastels is that they are supposed to work on a wide range of surfaces (I'm planning to test this out later!).


Two or three gentle swipes of the Sofft Knife No. 2 over the surface of the pan picked up plenty of colour and with limited pastel dust formation. The colour stays on the knife sponge and then covers the paper with a creamy, easily flowing feel that is lovely. Ok so what about blending? As with other pastels, the PanPastels can have a translucent quality so can be layered over each other (sprayed with fixative between colours), blended on the paper or, unlike other pastels, blended in the pan (don't worry you can easily clean the pan again with a wipe of a Sofft sponge so no contamination).


So you can blend your own colours as you use the pastels and get different tints and shades just by blending with black and white. As I mentioned the Sofft Tools have been specially designed to work with the PanPastels, they are far denser than any make-up sponge or Cut N' Dry and I think that helps with the cutting down on the dust and the colour loading, but that is just my opinion after a very quick try with both a make-up sponge and Cut N' Dry, I'm sticking to the
Sofft Tools.

The Sofft Tools are shaped so that you can get all of the marks and action that you can with a stick pastel or your finger and they are washable and re-usable. They are also easily cleaned with a wipe or two on kitchen towel between loading different colours so you don't even have to change them for each colour if you don't want to.

Ok so I've got the basics, how about making something? Well it just so happens that the PanPastels Challenge blog has a Dark and Mysterious theme running this week so perfect for putting PanPastels through their paces.


It is an altered book page all coloured and stamped with PanPastels, you will recognise my old friend the gentleman skeleton from Artistic Outpost of course!

After treating the book page, backed with card, to a couple of layers of gesso and letting it dry, I used a round Sofft Art Sponge to apply an intense layer of Bright Yellow Green. I then used the same sponge and the Crafter's Workshop numbers mask with Permanent Red to add colour to two corners.

I then lightly stamped the opposite corners with a music stamp and Versamark, crumpled up the whole page to get the crease marks and lightly swiped the round Sofft Art Sponge loaded with Black to get the aged look. Now I fixed with a pastels fixative spray (I've been told that hairspray works too), you don't have to fix as the PanPastels are worked into the paper by the tools. Personally I prefer to fix as you can get some lifting of colour and I was using black so wanted to make sure I didn't transfer it to anything else.

I ironed the page to flatten it out and added my stitching. The skeleton and sentiment were stamped onto some spare card with Versamark and sponged with the PanPastels.


Ok so by now I think you can see that I am in love with PanPastels, there is a texture and a versatility to them that I really like and I enjoyed using them which I haven't with some other pastel brands. I've put them through the ringer and they have exceeded expectations, I think they are a very useful and versatile addition to any artist/crafter's colouring box. 

And The Exclusive Offer?
If you are anything like me then I expect you would love to try these out for yourself?...So I'm really excited to say that thanks to the lovely people at Your Creativity Store, thanks Berni, I can share with you this great offer:


If you use this code: PanPastel10 (it is case sensitive so copy and paste to be sure), 

you will be able to get 10% off of any of the PanPastel and Sofft Tool products in stock at Your Creativity Store.

That includes the PanPastel Single coloursPanPastel SetsPanPastel Accessories and Sofft Tools.

The code is valid until 12pm on 24th November 2011, so spread the word, don't want folks to miss out!


Over To You...
I would love to know what you think. Have you used PanPastels yet? Have you seen them in use? How many colours have you got? Or which colours are on your wishlist. Any thoughts or comments are as always much appreciated.

Have fun PanPastel-ling!

Kim

(And now for the disclaimer - Your Creativity Store were very kind and sent me some PanPastel Colors and Sofft Tools to try out for this review, and to make some samples, but as with all my reviews I'm giving you my honest, unbiased opinion of these products, I can't help it if they are fabulous and I want you all to try them too! (No pressure though, I'm not getting any commission!))

Saturday 15 October 2011

If You Scare Easily Then Look Away...NOW!

This might be a bit scary...


You might want to look away...


Lock your doors and windows...


It's the haunted house stamp from the Artistic Outpost Haunted Halloween Stamp set available from Quixotic Paperie.


The base of the ATC is from the scary Echo Park Apothecary paper...


Are you suitable scared now?


Well I did warn you in the title!


Don't have nightmares!


Kim 'The Zombie Crafter' Dellow

Saturday 1 October 2011

More Spooky Saturday!

Watcha folks, still on my spook drive with more spooky makes for Quixotic Paperie and this little spooky ATC has a little spooky ghost, if you look carefully you might spot her!

It's Mini Gothilia from the Make It Crafty MonstaGalz, I think I might have mentioned last time how much I love these cute little guys!

A Halloween ATC with a Make It crafty digi-stamp


I've used the spooky Echo Park Apothecary papers and a bit of stitching with some ordinary black embroidery thread but have you seen the WRMK Sew Easy Fancy Floss Glitter? - reckon they would look good with this make too! Ooo glittery!


Have a Super Spooky Saturday!

Kim

Kim Dellow blog post signature

[21st Oct 2015 - This post has been edited to bring the links up to date and remove old, out of date information]


Come And Connect With Me:

YouTube

Instagram

My Shop

Join My Newsletter!

Facebook

Pinterest

Twitter

Saturday 24 September 2011

Enter The Monster

Hey all got some Monster spooky-ness for my Quixotic Paperie make for this week, but don't be scared he is really, really cute!

So after my mini-makes and review of Microcrafts yesterday I have more mini-ness for you today. I would like to introduce to you Mini Frankenstein's Monster from the Make It Crafty Mini MonstaBoyz Set

Sooooo Cute.


You can see he is mini as this is an ATC, so that gives you an idea of his size.


I've used him with Echo Park Apothecary paper which I've transferred onto an old book page on some corrugated card.


The brown snot running down behind mini Frank is a spot of Viva Decor Gloss Gel Pen in walnut brown.


Isn't he cute? Well he is just one of three in the Make It Crafty Mini MonstaBoyz Set and there is of course a MonstaGalz Set as well and it is just as cute! Oh yes I'm in love with these guys and you have to check them out!


Have a super fun day!
Kim


[21st Oct 2015 - This post has been edited to bring the links up to date and remove old, out of date information]


Come And Connect With Me:

YouTube

Instagram

My Shop

Join My Newsletter!

Facebook

Pinterest

Twitter

Saturday 10 September 2011

Spooky Saturday

Another Spooky make for you all today and this one is my DT make for Quixotic Paperie. Going all Halloweeny at the moment! You don't need to look away as there are no spiders on this one but there is a gentleman Skeleton! He is from the Artistic Outpost Haunted Halloween stamp set and when I first saw him I knew that I had to have him!


I've matched him with the fabulous Echo Park Apothecary papers and some chaotic stitchery.


If you look carefully you might see that the sentiment, also from the Artistic Outpost Haunted Halloween stamp set, is in fact hanging from a thread and is free to swing eerily around the front of the card.


When you pick up your Artistic Outpost stamps don't forget to get some EZ Mount as well.


ps. I've linked this up to the Artistic Outpost September referral program and whilst you are there also check out their lovely stuff.

Have a super scary Saturday.
Kim

Thursday 8 September 2011

How To Make Acrylic Paint And ZIG Alcohol Blender Ink Backgrounds.

I promised you all a tutorial for my La-La Land Crafts DT make for this week's Inspiration Monday. Well here as promised is how I made the spooky background for the little Skeleton Luka Tag.

I adapted the technique from Nancy Reyner's book Acrylic Revolution and is really easy to do if you have a little bit of time and want to play with some acrylic paint and alcohol blender ink. I just love the texture it adds to a make!

[There are some affiliate links in this blog post, so if you buy through them I do get a small amount of money at no extra cost to yourself. Thanks for your support!]


You will need:
Corrugated Card
Old Book Page
A Liquid Glue (like PVA or Elmer's)
Acrylic Paint
Alcohol Blending Ink (like ZIG Kurecolor Blender refill/alcohol ink; Adirondack Alcohol Blending solution or Rubbing Alcohol solution)
Golden Polymer Medium (Gloss)
Non-Absorbent surface (like an Acrylic block)
Non-Absorbent dip stick (like a palette knife)

Plus - Your favourite La-La Land Crafts Halloween Image (mine was Skeleton Luka and you can get him as rubber stamp or as a digi-stamp), colouring materials, button, needle, sewing machine, thread, eyelet and eyelet puncher, button, black ink pad, Alpha stamps.


Step One - Prepare The Background
Cut a piece of corrugated card to bigger than you want your final tag to be and if you need to, take the top layer of paper off to expose the corrugations.

Tear out a page from an old (unwanted!) book and use the glue to stick the page to the corrugated card and let it dry fully.

Once dry tear off the book page to reveal the corrugated card again, you can leave on or take off as much as you want!


Step Two - Seal The Surface
You need to coat the support with a layer of medium to seal it, so try a gloss medium like the Golden Polymer Medium. Before you coat the book page/corrugated card it is quite absorbent and will just soak up the acrylic paint and alcohol blender solution and you wont get the
same effect.

Allow this layer to dry before moving on to the next step.


Step Three - Paint The Tag
Cut out the tag shape from the prepared corrugated card. Make up an acrylic paint solution with your chosen colour and some water, I used approximately 1:1 water to paint for my glaze but it really is down to personal preference and the acrylic paint you are using.

Now you will have to start working a bit quickly at this point as you do not want the paint to dry before you add the alcohol blender ink.

Paint the tag and move directly onto the next step.


Step Four - Add The Blender And Watch The Magic!
Add a couple of drops of the alcohol blender ink to a non-porous surface (I used an acrylic block) and dip your non-porous dip stick (e.g. a palette knife) into the drops and then touch it to the still wet acrylic paint on the tag.

The alcohol blender ink spreads in a circle pushing the acrylic paint away from the area leaving a really interesting look. The more alcohol blender ink you add the bigger the circle will be so try adding different amounts to get different looks, but be careful not to use too much as it will wash the paint away completely.

Repeat this process as many times as you want to get the look you want. When you have finished let the tag dry.


Step Five - Add A Bit Of Stitchery
Free-stitch, machine stitch or hand stitch (whichever you are most comfortable with) a spider's web at the top of your tag.


Step Six - And Finish!
Sew on a little spider button and stitch it some legs - creepy! Edge the tag with the black ink pad and add the eyelet. Colour your La-La Land Crafts image and stick to the tag. Finish with the little sentiment. 

Have fun with this one! As always if you use this one I would love to see what you make and if you leave a comment with a link I'll be sure to pop by.

Catch you later alligator.
Kim


Pin It